As a feature, click tracking in Google Tag Manager is a perfect bait for a beginner. It’s fairly easy to get started: read one or two blog posts, maybe watch a video and done! You can track buttons, outbound link clicks, etc. However, what I’ve noticed among GTM beginners is that they do not fully realize the click tracking configuration flow in GTM and why is it necessary to complete one thing or another.
Moreover, intermediate Google Tag Manager users are not always aware of some more serious click tracking techniques that open entirely new possibilities in tag management.
That’s why I’ve decided to publish this (once again) extended/definitive/you-name-it guide on Google Tag Manager click tracking, covering not only basics but some advanced stuff as well.
Table of Contents
- #1. Why click tracking is so important?
- #2. Two types of click triggers
- #3. What’s the plan?
- #4. Google Tag Manager Link Click Tracking
- #5. Google Tag Manager button click tracking
- #6. Working faster with GTM recipes
- #7. Going deeper with Google Tag Manager click tracking
- Google Tag Manager Click Tracking: Final Words
#1. Why click tracking is so important?
I will not give you any statistics here but think about what are the most common interactions you do on any website. It’s page-loading, scrolling, and clicking. You click links and buttons to navigate from one page to another, to reach a particular goal.
That’s why it’s crucial to track such interactions – to better understand user/visitor behavior. Capture clicks, send their data to 3rd party tools, like Google Analytics, and analyze the data.
With Google Tag Manager the most popular tracking use cases are:
- Button click tracking (say “Add to cart” button clicks)
- Outbound link clicks (track when a visitor clicks a link leading to an external resource (3rd party website))
- Contact link clicks (e.g. clicks email addresses or phone numbers)

#2. Two types of click triggers
There are two types of click triggers in Google Tag Manager: All elements and Just links.

As their titles imply, All elements trigger tracks clicks of any element (link, image, button, etc.), while Just links trigger tracks link clicks only. If an HTML element is clicked and it (or its parent elements) has no hyperlink, the Just links trigger will not catch that click.
Here’s an example, a button that has a link.
And here’s its HTML:
<div class="button-main">
 <a href="https://www.example.com/purchase">
   <span>Buy now</span>
 </a>
</div>
The button is a block that is called <div> in HTML (full name: division). Inside of the div, we have a link (<a> tag, a.k.a. “anchor” tag) and inside that link, we have a text “Buy now”. 3 levels in total.
GTM click triggers (Just links and All elements) will act differently here.
If I enable Just links tracking and click the “Buy now” caption, GTM will start climbing up the website’s document until it reaches a link. In this case, it will climb from the <span> element (because I clicked the “Buy now” text) and it will stop on the <a> HTML tag because IT IS a link.

All elements trigger is more straightforward here. If you click “Buy now”, it will track the click of the “Buy now” text, which is in the <span> HTML element.

In plain English:
- Just links trigger tracks only link clicks.
- All elements trigger tracks clicks of elements that were actually clicked, regardless of whether they have a link or not (e.g. image, website background, button text, etc.

#3. What’s the plan?
Anyway, the best way to master Google Tag Manager click tracking is by doing. And that’s exactly what we are going to do in this guide. But before that, let’s review the workflow that you’ll need to follow every time you want to track clicks.
- Step 0. Decide what you want to track, links or any elements.
- Step 1. Have at least one click trigger (the type of a trigger depends on the step 0) enabled on the page.
- Step 2. Enable all click-related built-in variables
- Step 3. Create a tag (say, Google Analytics event tag)
- Step 4. Update the click trigger to track only particular clicks and then assign the tag to it.
- Step 5. Test.
The same workflow applies to both Just links and All elements triggers. Let’s see it in action.
#4. Google Tag Manager Link Click Tracking
By default, Google Tag Manager does not track clicks. You can check that by enabling the Preview and Debug mode and refreshing the web page that you’re working on. You’ll see three events in the debug panel, Page View, DOM Ready, and Window Loaded.
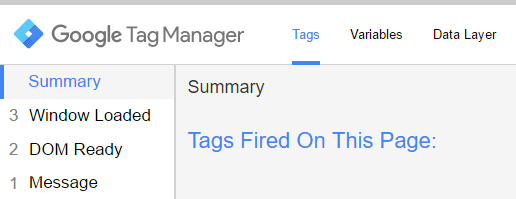
Now, click any element on the page (not in the GTM debug panel) and see what happens on the left side of the panel. Nothing. You will still have those 3 events (unless, of course, you have implemented some other tracking functionality in your GTM container sometime before).
This happens because, by default, Google Tag Manager does not track clicks, therefore, you need to configure it by yourself. Let’s start, shall we?
Remember that 5 step workflow from the previous chapter of this blog post? Well, 6-step, if you count the step 0. In this guide, I’ll mention it several times because I want you to memorize it. That workflow is crucial in order to master click tracking. In fact, it applies even to more triggers, e.g. Youtube.
OK, let’s think which link clicks should we track first. How about outbound link clicks?
#4.1. Use Case No.1. Outbound link tracking
According to our Google Tag Manager click tracking workflow, step 0 is to decide what we want to track. This step is already complete because we chose outbound link tracking. Let’s proceed to step 1.
#4.1.1. Step 1. Enable a generic link click trigger in GTM
In order to enable link click tracking, we need to enable a thing called link click listener (a.k.a. link click auto-event listener). It’s a feature in GTM that listens to link clicks on a page. If it spots one, it will display that event in the GTM Preview and Debug (P&D) mode and we’ll be able to use it as a condition to fire tags. To be more precise, the listener pushses the click data to the Data Layer.
In fact, there are many auto-event listeners in Google Tag Manager. Speaking of built-in listeners, there are Youtube listener, scroll listener, element visibility listener, etc. Also, there is a whole bunch of custom auto-event listeners, e.g. Vimeo listener, Mixcloud player listener, etc. Some of them are available in the GTM Recipe library.
How can we enable that auto-event listener? – you may ask. The answer is by having at least one link click trigger enabled on a page. And this is exactly what we’ll do in this chapter.
In Google Tag Manager, go to Triggers > Trigger Configuration > New > Just Links. Leave all the settings as they are and name the trigger All Link Clicks (or anything else).

Speaking of two checkboxes, here is a quick overview:
Wait for tags is useful if the link opens in the same browser tab. If you have any tags linked to the link click trigger and Wait for tags is enabled (say for 2000 milliseconds), GTM will put the redirection temporarily on hold (for up to 2000 milliseconds) to give tags a chance to properly fire. Once the tags have properly fired or 2000 milliseconds have passed, the user will continue navigation to another page. You can change the duration of that pause, not limited to 2000 milliseconds.
Check Validation checks if the click was actually valid. This setting is mentioned in two guides by Simo Ahava. Pretty often I leave this checkbox unchecked.
===
Back to our generic link click trigger. Save it and refresh the preview and debug mode. Go to the page where you wish to track links. Click any link on a page.
If the link opens in the same browser tab, make sure that you click the link by holding CTRL or CMD keys on your keyboard (in order to open the link in the new tab). Why? Because if the page refreshes, the Preview and Debug mode resets as well, therefore, you won’t be able to check what click data is available once that click is captured by the GTM. And that will be very important in Step 2.
So once you have clicked the link, take a closer look at the Preview and Debug panel. You’ll see a new event, gtm.linkClick. That’s what our link click auto-event listener did. It was listening to link clicks on a page and once it spotted one, it pushed a gtm.linkClick event to the Data Layer and, therefore, it became visible in the debug console.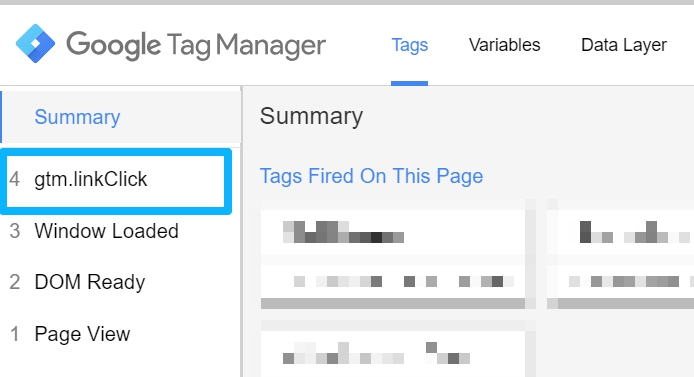
If you don’t see this event, make sure you have refreshed the Preview and Debug mode (by clicking the Refresh link in the orange banner) and then refreshed the web page (that you’re working on) once again.
To quickly sum up, we created a generic link click trigger because we needed to have the link click auto-event listener enabled on a page. If at least one link click trigger is enabled on a page (not activated but just waiting for a moment to fire), the link click listener becomes enabled in the background.
Thanks to this, we are able to see link click events in the P&D mode and inspect what data is available with each click.
Speaking of data, read the following chapter.
#4.1.2. STEP 2. Enable built-in click Variables
In order to create more precise triggers, we need yet another ingredient, variables. What are those?
They are little pieces of information which can be used both in Tags and Triggers (and, in fact, in other variables too). For example, Click ID. You can use it as a trigger condition (e.g. fire Google Analytics Event code when the ID of the clicked button equals to “main-cta-button”).
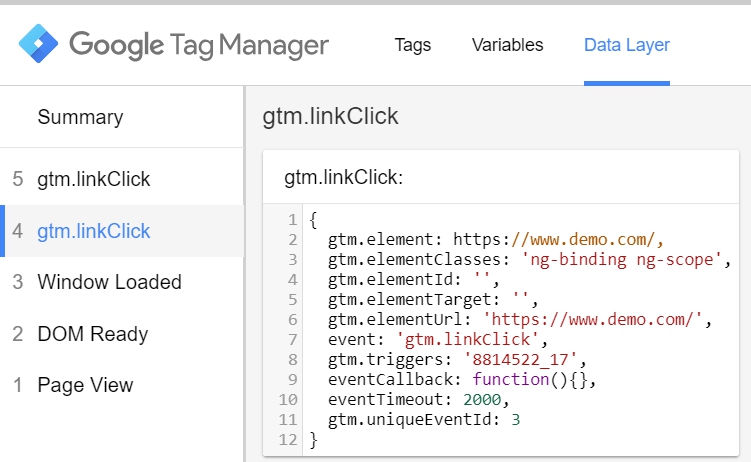
Thanks for GTM Preview and Debug mode we can see what variables are available at every event. Click gtm.linkClick event and go to Variables tab. Keep looking for anything related to clicks. If you’re working on a new container, you’ll probably won’t find anything.
Don’t worry, that’s expected. Now go to the Data Layer tab (while gtm.linkClick) is still chosen. There, you’ll see some link-click-related parameters, like gtm.elementId or gtm.elementClasses, for example:
Even though the click data is tracked by Google Tag Manager, it is not available in the Variables tab of the P&D console. Why? Because built-in click variables are not enabled in the GTM interface. So what? If some data is not available as a variable in GTM, you cannot use it in your triggers.

Let’s activate them.
In your GTM account, go to Variables and in the Built-in Variables section click Configure. A panel will appear on the left side. Scroll down until you find click variables and enable ALL of them one-by-one.

After that, refresh the Preview and Debug mode, refresh the web page that you’re working on and click a link once again (if it opens in the same table, also hold the CTRL or CMD keys pressed while clicking).
A gtm.linkClick event will appear in the event list of the P&D console, click it. Now go to Variables tab and keep looking for click-related variables. Bingo!

#4.1.3. STEP 3. Create a tag
Say, that we want to send outbound link clicks as events to Google Analytics. To do that, go to Tags (in your GTM interface) > Tag Configuration > Universal Analytics.
And enter the following settings:

In fact, you can enter anything that is meaningful to you in the Event Category, Event Action, and Event Label fields. The screenshot above is just for the demonstration purpose.
If you don’t have any Google Analytics Settings Variable in the container yet, create one by clicking the drop-down list and choosing New Variable.

At least for now, enter the GA Tracking ID of your property (it looks like this UA-XXXXXXX-XX) and hit Save.
If you want to use other GA features, like custom dimensions, cross-domain tracking, you’ll need to do additional configuration in the GA Settings Variable.
With GA Settings Variable you’ll be able to reuse the same GA settings in multiple Google Analytics tags. Each GA tag requires a Tracking ID and, optionally, other settings to configure. Once you have 20, 50, or even more Google Analytics Tags, the management on the individual level becomes unbearable.
That’s where the GA Settings Variables saves the day: after you make a single change in the variable, all the tags that are using the variable will automatically inherit the change.
#4.1.4. STEP 4. Update the trigger
The next step in this workflow is to update our trigger and then assign it to the Google Analytics tag. We want our tag to fire not on all clicks, but only those that are external (outbound).
What is an outbound link? Which variable in Google Tag Manager should we use as a part of the triggering condition? Let’s check the P&D console and see what we have.
Once you have the Preview and Debug console open, click any outbound link on a page and then click the gtm.linkClick event in the events stream. Go to Variables tab. Which variable should we use in order to distinguish an external link from an internal one?

The domain (Page hostname) of the current page is www.example.com (see the screenshot above). All the links (Click URL) that are considered as internal if they also belong to Page Hostname, therefore, all external links (Click URL) are the ones of which do not belong to the www.example.com.
And this is exactly what we need to do: create a link click trigger that listens only to those clicks that do not belong to our website’s hostname (e.g. www.example.com).
Go to Google Tag Manager > Triggers and open the previously created “All link clicks” trigger. We’ll edit it to track only outbound link clicks. Rename it and change its settings like in the screenshot below (of course, replace www.example.com with the actual domain that your website belongs to):

Here’s a little of explanation: what is an outbound link? It’s a link that does not belong to the domain of the current website. That’s why I’ve set the trigger to track all links of which hostname does not equal to “analyticsmania.com”. In your case, you should enter your domain there.
If there are several domains you do not want to track, then change trigger’s condition to Click URL does not match RegEx (ignore case) domain1.com|domain2.com (replace these domains with actual domains and add a backslash ( ) before all dots.

After you save the trigger, open the GA Event tag and assign the trigger. Like in the screenshot below.

If you want to have an even more precise trigger, you should create a custom variable. Instead of using Click URL, you would be using the variable Click Hostname. To create one, go to Variables > User Defined Variables > New and choose URL Variable and enter the following settings.

Use this variable in your outbound link click trigger instead of {{Click URL}}.
#4.1.5. An alternative configuration of the Outbound link click trigger
There are other ways how you could configure the outbound link click trigger in Google Tag Manager. The first option is implemented in the GTM recipe created by Lunametrics (here’s the link to it in the GTM library). They created a Custom Javascript variable that checks whether the clicked link belongs to the current website or to some external resource. Then this variable is used in the click trigger. The advantage of such a solution is that it automatically adapts to any website and does not require any reconfiguration.
#4.1.6. Step 5. Test
Enable (or refresh) the Preview and Debug mode, go to your website and refresh the page. Here are scenarios you should test:
- Click an internal link (e.g. the one that opens a “Contact us” page). The outbound link GA tag must not fire.
- Click an external (outbound) link. The GA Tag must fire. If the tag did not fire, click it in the P&D mode.

and scroll down to Firing triggers section and check if all the conditions were not met (marked with a red X).
- Then check GA real-time event reports and see if you are getting the data.
If, for some reason, you don’t see the data in Google Analytics real-time reports, read this guide.
#4.1.7. Important!
Before we continue, keep one thing in mind: if any link click trigger is enabled on a page, you’ll see gtm.linkClick events every time any link is clicked. It does not matter whether you have configured the trigger to fire on just particular link clicks. You’ll see gtm.linkClick every time any link is clicked.
That’s ok and this behavior is expected.
Every time a gtm.linkClick event fires, Google Tag Manager evaluates all the variables and your trigger conditions (that you’ve set in the GTM interface) and then decides whether to fire particular tags or not. The same applies to the All Elements trigger that we’ll also try in this guide.
So even though you’ll see many gtm.linkClick events, that does not mean that your tags will be fired on each one of them. GTM will handle the moment of when the tag is activated.
#4.2. USE CASE No.2. Track contact links
This time, let’s do a quicker overview because the workflow is pretty much the same (only the conditions in the trigger are different. And a GA tag, of course).
What are contact links, you say? They are phone numbers (a link starts with “tel:”) and email addresses (a link starts with “mailto:”) on a website that can be clicked by a user.
- Step 0. Decide what you want to track: links or other elements. Done. We want to track contact link clicks, therefore, we’re using the Just Links trigger.
- Step 1. Have at least one click trigger (the type (Just Links or All Elements) depends on the step 0) enabled on the page. Done. We already have it from the outbound link click use case. It does not matter that the outbound link click trigger does not track contact link clicks. What matters is that the link click auto-event listener is enabled on the page and we can see all the link clicks in the Preview and Debug mode. That’s helpful because we can inspect those clicks and see what click-related data is available.
- Step 2. Enable all click-related built-in variables. Done. We have also done that in the outbound link click tracking case.
- Step 3. Create a tag (say, Google Analytics event tag). Create a tag that will send the event data every time a visitor/user clicks a contact link. You can copy the GA tag we used in the outbound link click example and just change the Event Category and Event Label. In the screenshot below, I just changed the Event Action.
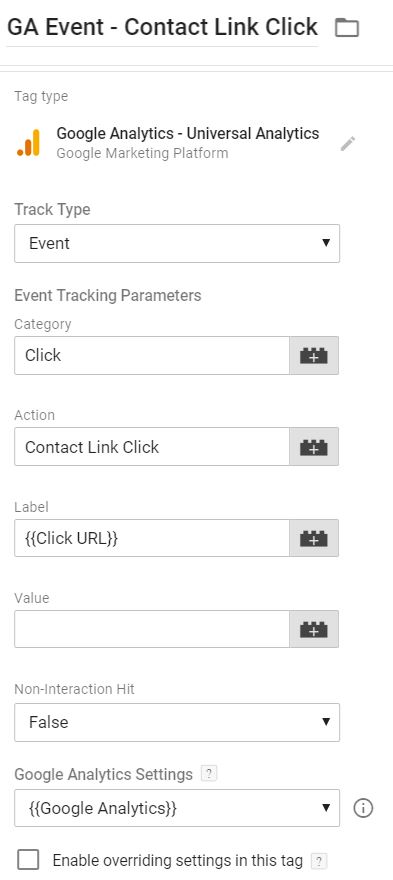
- Step 4. Update the click trigger to track only particular clicks and then assign the tag to it. In this case, we won’t need to update a trigger, we’ll need to create a new one. With the following settings:
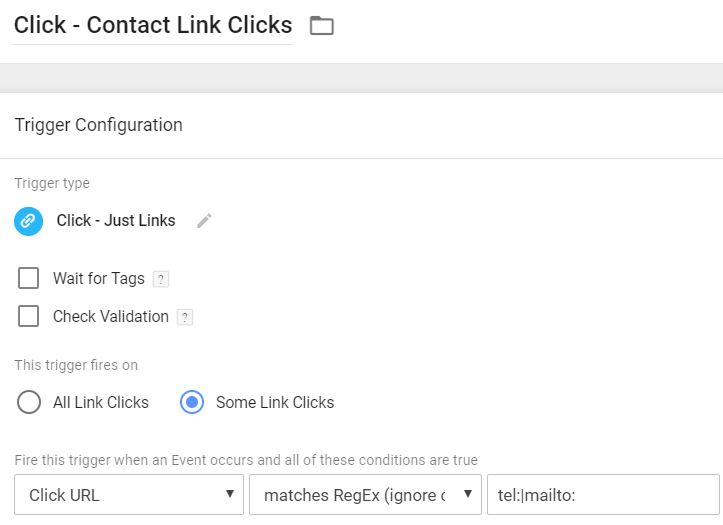
The condition is Click URL matches Regex (ignore case) tel:|mailto:. This means that if a clicked link contains either “tel:” or “mailto:”, a tag will be fired. - Step 5. Test.
Much faster right? Once you get this workflow, things will get much easier to you with GTM. The same applies to Youtube, Scroll tracking, etc. (but definitely not limited to). Let’s do a quick recap:
- In case of link click tracking, we need to have at least one link click trigger enabled on a page. Trigger conditions do not matter, can be All link clicks, can be Some link clicks. This enables the link click auto-event listener and it starts running in the background. Every time the listener catches the click, it pushes the click data to the Data Layer. We cannot use that data until we instruct GTM to read it (by creating variables).
- Enable click variables. They will read the click-related data from the Data Layer and make it available in your tags, triggers, and even other variables.
- Create a tag that you wish to fire on each link click. In this guide, we created Google Analytics tags.
- Create a new trigger (or update the existing one) to fire only when you really need it (e.g. on outbound link clicks).
#5. GOOGLE TAG MANAGER Button CLICK TRACKING
You probably think that we’ll be using All Elements trigger in this case. And you’re right. But that does not mean that buttons always require this trigger. Many buttons are just links with the style of a button. So you can always try to use the Just Links trigger first before trying the All Element trigger.
However, I want to show you what the All Elements click trigger is and why is it different from the Just Links.
As you can guess from its title, All Elements tracks clicks of all elements on a web page (including links). If you click on a page title, image, or background, all clicks will be tracked by the click listener and you’ll see those events in the GTM Preview and Debug mode.
#5.1. STEP 1. Create A GENERIC All Elements CLICK TRIGGER IN GTM
Just like with the Just Links trigger, you need to have at least one All Elements trigger enabled on a page in order to see click events in the P&D console. You can try it for yourself. If you have enabled only Just links trigger and try to click an image on a page, you’ll get nothing in the debug console.
That’s why we need to follow the same workflow (just as we did with the link click tracking). Go to GTM interface > Triggers > New > All Elements. Leave all the settings as they are and save the trigger.
f
Refresh the Preview and Debug mode, then to a web page you’re trying to work on. Start clicking anything (except the P&D console) and behold: you’ll start seeing gtm.click events in the GTM preview console.

This means that the All elements click auto-event listener has been enabled and all clicks are now being tracked.
#5.2. STEP 2. Enable click variables in GTM
If you click on any of these click events in the Preview console and go to the Data Layer tab, you’ll see what click-related data is available with that particular click. We could definitely make use of some parameters here, for example, gtm.elementId (which stands for Click ID). If we want to use it in the GTM tag, trigger, or another variable, we need to turn this data point (gtm.elementId) into a variable.

Luckily, all the built-in click variables were already enabled in one of the previous chapters (outbound link clicks). Just links and All elements triggers share the same set of click variables.

#5.3. STEP 3. Create a Tag
Let’s track some element (non-link) as an example, shall we?
I’ve got something useful, an Add To Cart button. Every time a visitor adds a product to a cart, we can send an event to Google Analytics.

This button has no link, therefore, Just Links trigger will not help. We’ll have to use an All Elements trigger.

But before we create/update a click trigger for the Add To Cart button, let’s create a Google Analytics event that will send the click data over to GA. In GTM, go to Tags > New > Tag Configuration and choose Google Analytics – Universal Analytics.
Enter the following settings:

Feel free to add any other values in the Event Category, Event Action, and Event Label fields. This time, I’ve even left the Event Label field empty (as it is not required).
If you don’t know what you should choose in the Google Analytics Settings field, read this blog post about the Google Analytics Settings Variable.
For now, save this tag without a trigger. Let’s move on.
#5.4. STEP 4. Create/update the click trigger
In order to create a precise trigger that tracks clicks of only the Add To Cart button, first, we need to click that button and inspect what kind of data is available in the Preview and Debug mode. Based on that data (variables), we’ll create (or update) the click trigger.
So let’s click the button and open the Variables tab in the P&D console. Scroll down and keep looking for all the click-related variables.

Cool, that button has an ID! We can use that in our trigger. However, don’t rush too soon. There’s one more thing you need to know. In the screenshot above, I click on a button text, therefore, the Click ID is AddToCartText. But if I clicked somewhere on the background of the button (not on a text), the Click ID would be different, AddToCart.

Why?
It’s because this button is not developed as a single element. Actually, it consists of two elements, text and the button shape/block.

That is also visible in the screenshot below:

All elements click trigger works pretty straightforward here. It tracks click of the actual element, regardless of whether that element is a part of some bigger element. If you click on a background, the listener will track the click of a background. If you click a text, it will track the click of a text.
As a result, in this case, there are actually two elements of which clicks we need to track in order to precisely capture Add To Cart clicks.
If that button indeed had a link, the developer would have probably wrapped both elements with a single link, therefore, Just Links trigger would have treated that button as a single element.
In such a case, after the button is clicked, the link click listener climbs up the document of a page and keeps looking for a link. It does not matter which part of the button is clicked, the listener climbs up and finds the same link. But with the All Elements click trigger it’s different we need to be more precise.
So what should we do now? The button has no link, therefore, the Just Links trigger will not help us. The button consists of two elements, therefore we need to track them both, preferably, with a single trigger.
What do those elements (button text and the button background) have in common? Their Click IDs are pretty similar. They both start with the AddToCart. That could be our click trigger condition.
Let’s do exactly that. In GTM, go to Triggers > New > All Elements and enter the following settings:

Keep in mind that this rule is not universal and will probably not apply to your project/websites. You’ll need to find a way how to create a unifying trigger on your own.
In fact, there is another way how to track clicks of several elements with a single trigger rule (that I personally use as well) but it’s more advanced. I’ll explain it a bit later. Spoiler alert: two words, the first one is “CSS”, and the second one is “Selectors”.
Back to our AddToCart click trigger. Save it. Then open the Google Analytics event tag that you’ve previously created and assign this trigger.

#5.5. STEP 5. TEST
Enable (or refresh) the Preview and Debug mode, go to your website and refresh the page. Here are scenarios you should test:
- Click the Add To Cart button text. The GA tag must fire.
- Click the Add To Cart button background. The GA tag must fire as well.
- Click any random elements on your website, the GA tag must not fire.
If, for some reason, you don’t see the data in Google Analytics real-time reports, read this guide.
#6. Working faster with GTM recipes
If you’re not familiar with GTM recipes, they are GTM container templates that can be imported and automatically create tags, triggers and/or variables. In my free GTM Recipe library, currently, you can find two click-related recipes (both are created by the team of Lunametrics):
- Recipe for Outbound link clicks (this one automatically adapts to any website and tracks clicks of all links that do not belong to the current domain of a website).
- Recipe for Contact link clicks
Instead of manually creating tags/triggers and variables for every project, you can just import the container and save some time.
#7. Going deeper with Google Tag Manager click tracking
Cool, now you know the basics of Google Tag Manager click tracking and how to use it in your tag management stack. But the journey just begins here, there are still some techniques you should master.
#7.1. Get additional click data with the Auto-event variable
Auto-Event Variables are used to access the target element of an auto-event action (e.g. Click). For example, when you click a link, you can access link’s text.
So what’s the deal?
The thing is that in GTM, you can create custom auto-event variables and use them in tags, triggers, and/or other variables. Let’s say that you want to track clicks of a particular image. That image contains some additional parameter (e.g. “alt”) that you can see by inspecting it with browser’s developer tools (e.g. in Chrome, right-click on an image and choose Inspect Element).

What if you wanted to use the value of the “alt” parameter in your tags, triggers and/or variables? You’d need to fetch it somehow.
That’s where an auto-event variable becomes very handy. With it, you could read the value of the “alt” parameter when a user interacts with an HTML element (in this case, that interaction could be a click).
How do you create that variable? Go to GTM > Variables > New > User-defined Variables and choose Auto-event Variable. Enter the settings as I’ve displayed them in the screenshot below.

That’s it. Now you can use this variable in your tags, triggers, and other variables. Just remember that the value of that parameter is accessed when a user interacts with a particular web element.
How to test if the variable was created correctly? Save the variable, then refresh the Preview and Debug mode, and finally, click the element of which “alt” parameter you wish to access. Now, go to Preview and Debug mode’s Variables tab and check if the value is actually fetched correctly.
If you want to learn more about the Auto-event Variable, read this guide. To give you more inspiration, Lunametrics have also posted a guide on how to use so-called “data-” attributes in links and how to track them.
#7.2. Using CSS selectors in click triggers
If you’re just starting with Google Tag Manager click tracking, soon you’ll start seeing the limitation of beginner’s skill set. Soon your triggers where Click Classes contains XXXXX will not be enough. You’ll want more.
You’ll want to track particular set of elements that don’t have any classes or another parameter in common. Let’s go back to our Add To Cart button tracking example. Turned out that one button actually consists of two elements: button text and button background/rectangle.

We were lucky and were able to create a trigger with a single condition (Click ID starts with “AddToCart”). However, sometimes, things might get more complicated when no IDs or useful Click Classes (read: CSS Classes) are available. What if a page element actually consisted of 5 or more elements?
You could create multiple variables for each element and assign those triggers to a single tag but that’s not the way you should do. Your container must be as optimal as possible that’s why we should cope with that by creating a click trigger and using CSS Selectors.
CSS Selectors are patterns that you check for in any given HTML element. In CSS, selectors allow developers to select one or many website elements and assign them a particular style/design. For example, a developer can set that all HTML elements that belong to the class “red-button” should be of red color. This is a very simplified explanation but that’s generally the idea behind it.
CSS selectors can be pretty complex and we can use them in our GTM triggers. To do that, you’ll need to choose a special operator in your trigger conditions. Usually, you probably use contains, equals, matches Regex (ignore case) operators. But this time, we’ll use Matches CSS Selector (or Does not match CSS Selector).
Let’s see how this works in action. We’ll apply CSS selectors to track Add To Cart button clicks (from the chapter No. 4 of this guide). Take a look at the code of that button (in the screenshot below).

The button is created with an HTML element called button (with the ID AddToCart) and its direct child is a <span> element that contains the button text. With a single CSS Selector, we could instruct Google Tag Manager that we want to track clicks of an element of which ID is AddToCart and also all we want to track clicks of all its children (descendants).
In GTM, go to Triggers > New > Clicks > All Elements and enter the following settings:

Take note that we’re using Click Element as a variable because we are checking the entire clicked HTML element against our CSS Selector.
#AddToCart * CSS selector means that we are interested in clicks of ALL elements that have AddToCart ID (exact match) and the descendants of such elements. In our case, button text is a direct descendant of the button that has an ID AddToCart. Simo Ahava has published a guide explaining the technique of Wildcard CSS Selectors so go check it out.
It will be quite a challenge to master CSS Selectors for a non-developer but it’s pretty simple to get started and learn at least some very basics. Here are additional guides for you to dig in:
Google Tag Manager Click Tracking: Final Words
In this pretty lengthy guide, I’ve explained the very basics of Google Tag Manager click tracking and what workflow you should follow in order to track clicks properly (complete all the following steps):
- Have at least one particular trigger enabled on a page. If you plan to track link clicks, then have at least one Just Links trigger enabled on a page (regardless of what are the conditions of that trigger). If you plan to track any element, then All Elements is the way to go.
- Enable built-in click variables. After the trigger and variables are intact, click the element you wish to track and inspect that event in the GTM Preview and Debug mode. You’ll need to think what variables and condition will you be using in a click trigger.
- Create a tag that you want to fire when a user clicks a link/ another element.
- Update the click trigger (if you created a generic click trigger in the first step of the flow) or create a new trigger with the precise conditions and assign it to the trigger(s) you want.
If you want to take your Google Tag Manager click tracking to the next level, consider learning how to use Auto-event Variable and CSS Selectors in GTM.
Did I miss something about the Google Tag manager click tracking? Do you have any additional questions? Let me know in the comments.
The post Google Tag Manager Click Tracking: All You Need to Know appeared first on Analytics Mania.
Source: analyticsmania