If you’re interested in tracking website visitors and seeing that data as heat maps, then Hotjar is the right tool for you. In fact, the tool doesn’t only allow you to create heat maps but also lets you view things as scroll depth, create funnels, and ask your visitor questions, and more.
Since Analytics Mania’s main target is GTM users, this blog post will not be an exception and I’ll show you how Hotjar and Google Tag Manager play along.
Other guides I’ve seen online, usually explain just the installation part, even though there’s much more to be discovered, like event tracking, session tagging and more.
Table of Contents
- What is Hotjar?
- How to install Hotjar via Google Tag Manager?
- How to track page views on a single-page website with Hotjar and Google Tag Manager?
- How to track events with Hotjar and Google Tag Manager?
- How to tag Hotjar sessions with Google Tag Manager?
- Minor optimization
- Hotjar and Google Tag Manager: Conclusion
So what is Hotjar?
It’s very popular analytics and feedback tool used by giants like Unbounce, Invision, Autodesk, Microsoft, and many other top-class tech companies. Main features:
- Analytics:
- Record heatmaps (based on clicks, scroll, and mouse movement)
- Record actual user sessions, see them on an individual level and see where they clicked, where they bounced, etc.
- Track funnels (this feature is based on page views only, but I’ll show you a workaround)
- Track form engagement
- Feedback:
- Collect feedback
- Run polls and surveys
- Invite visitors to a live user test via screen sharing (e.g. via Skype) to see how they actually use your pages and what they are thinking (a feature called Recruiters).

If you want to learn more about Hotjar, you can do that on their official website.
How to Install Hotjar via Google Tag Manager?
It’s fairly easy to install Hotjar via GTM (if you just want the standard functionality, like recordings and heatmaps). There is even a ready-made tag template available in Google Tag Manager.
Before we start creating a tag, sign-up for a Hotjar account. They offer both free and paid plans. After registration is complete, you’ll be asked to add their tracking code to your website.
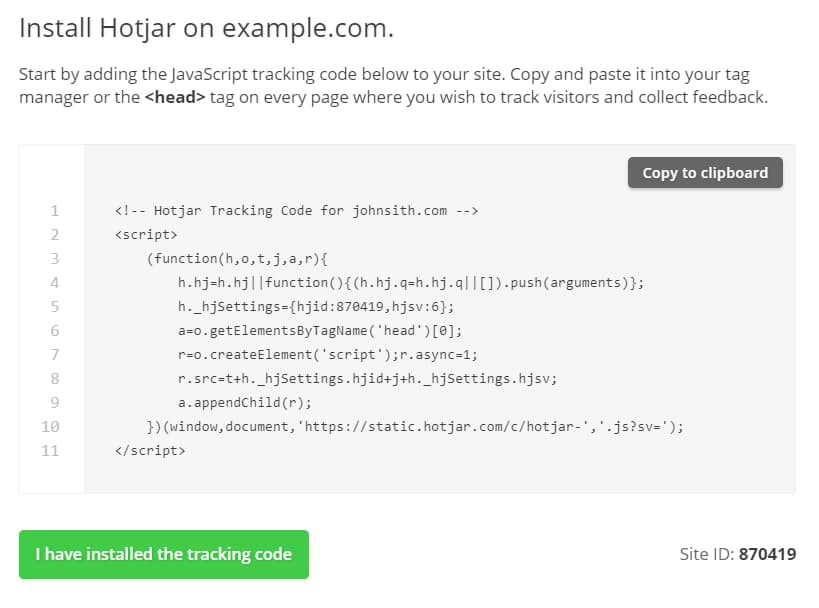
You can either create a Custom HTML tag and paste the entire tracking code there or just take the Site ID and use a predefined Tag Template instead. We’ll go with a ready-made Hotjar Tag template (both options serve the same purpose, therefore I don’t see a big difference here which option should you choose).
Anyway, copy Hotjar Site ID (it’s in the bottom right corner of the screenshot).
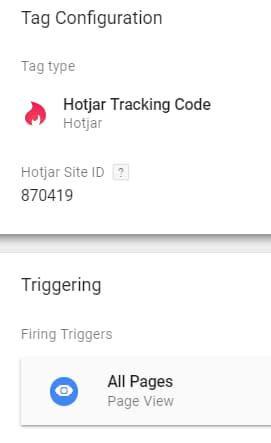
Log in to your Google Tag Manager account, go to Tags > New. In Tag Configuration, choose Hotjar Tracking Code and paste the Site ID you’ve copied before.
In the triggering section, choose All Pages.
Save the tag. Let’s test it, enable Preview and Debug mode, navigate to the website you’re working on and refresh the page. After the Preview and Debug Console appears, click Page View event and check if Hotjar Tag fired.
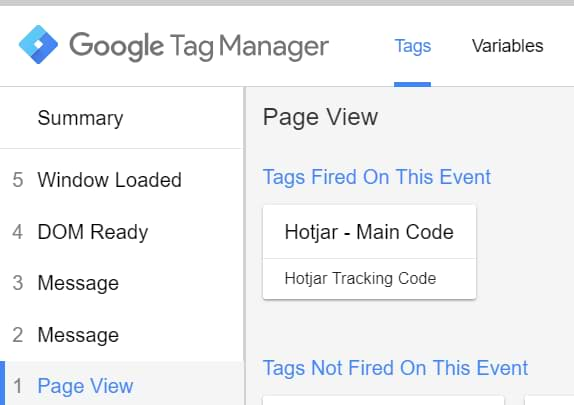
Now go to another page of your website and repeat the action. A Hotjar tag must fire on all pages, therefore, you should test it on at least 2-3 pages.
If everything is fine, publish the container, go back to Hotjar and click a green I have installed the tracking code button. Hotjar will then verify the implementation.
That’s it! So far so good, right? That was pretty easy.
But what about single page websites/applications? Continue reading to learn more.
How to Track Page views on a single-page website with Hotjar and GTM?
If you’re new to single-page websites, here’s a quick definition: a Single Page Application (SPA) is a web application or website that loads all of the resources required to navigate throughout the site on the first page load. As the user clicks links and interacts with the page, subsequent content is loaded dynamically.
In single-page website/app, all of the necessary code is loaded once and the page does not reload during the entire user session. That is why regular analytics tools track only one page view, even though a user has seen multiple pages or has scrolled down through many sections of a page. The URLs might change but that is just to give the perception of logical pages.
It’s pretty common among single-page applications/websites to use URL fragments in their URLs. When you navigate the website, take a closer look at the browser address bar. Does the URL have a hash mark? For example, https://www.mywebsite.com/home#pricing. Everything that comes after a hash mark is called URL fragment.
It would be nice to track changes of a URL fragment as separate pageviews, wouldn’t it? Luckily, Hotjar has a built-in functionality which can track changes of a URL fragment, but it’s not enabled by default.
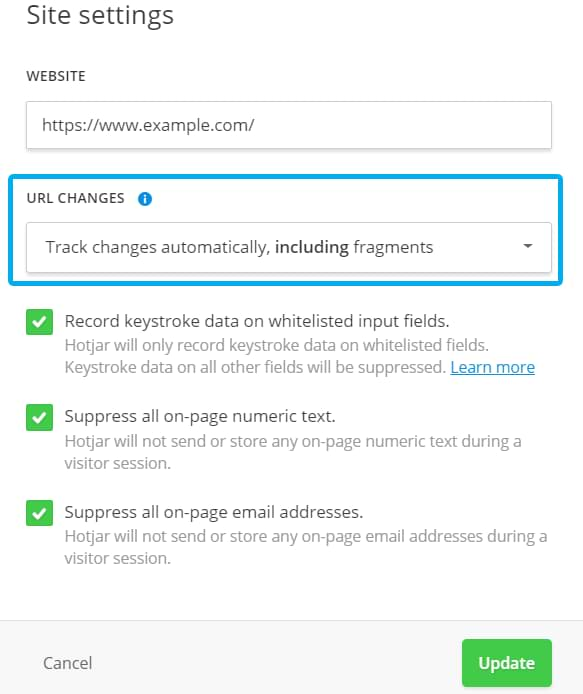
In order to turn URL fragment tracking on, go to Hotjar account’s settings, choose Sites & Organizations, and then click a gear icon (Site settings)
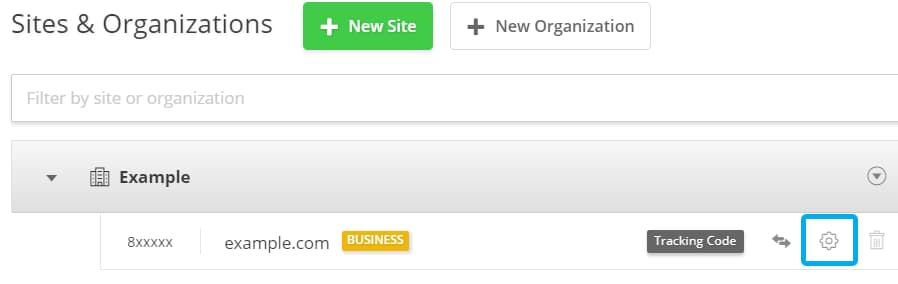
Enable Track changes automatically, including fragments (in the URL Changes drop-down). Hit save.
If for some reason, no separate pageviews appear in your recordings (even after a few hours have passed), you still have a plan B. Hotjar allows users to manually send page view data.
According to their documentation, you can manually issue a state change which is a fancy name for a page view. In order to do that, you’ll need to fire a custom HTML tag with this code:
<script>
hj('stateChange', 'some/relative/path');
</script>
some/relative/path should be replaced with some meaningful value, e.g. ‘contact-us’, or ‘pages/pricing’. These values will be displayed as Page Paths in Hotjar’s reports and recordings.
Why do you need to track such page views at all? Well, they will come in handy in your Hotjar Funnels (each state change can be used as a step of a funnel (currently, Hotjar supports only pageviews in their funnels)). Additionally, a number of page views are visible in each session recording and that’s also useful.
So what’s the plan with single-page website tracking?
- First, we’ll need to think about the trigger ( a condition which will dispatch a state-changing Hotjar tag).
- Then we’ll need to pass some meaningful data as a page path (a.k.a. replace ‘some/relative/path’ part of the aforementioned code snippet). This can be achieved with a Data Layer variable.
- Finally, we’ll create a tag.
Trigger
Honestly, I don’t know if the History change trigger will be useful here. By saying that, I’m pretty sure that Hotjar’s built-in functionality already catches relevant history changes (a.k.a. when URL Fragment changes). So if it’s not working, probably, the History change trigger will also not help.
Nevertheless, if you feel lucky, try using History Change Trigger. If that method doesn’t help, here’s another solution: ask a developer to use dataLayer.push method whenever a state/view changes on the screen. You could use that push as a trigger which will then fire the Custom HTML tag with Hotjar’s state-change code.
Give a developer this code and tell him/her to dispatch it whenever a page/state/view changes in the single-page app/website.
window.dataLayer = window.dataLayer || [];
window.dataLayer.push ({
 'event':'stateChange',
 'pagePath': 'somePagePath/page' // replace this value with the actual path of a page
})
This code will send an event to the Data Layer and will contain an additional key, pagePath. We’ll use the event as a triggering condition and a pagePath to replace some/relative/path in Hotjar’s code.
Just make sure that the developer implements this code in a correct way, meaning that somePagePath/page should be dynamically replaced according to the visitor’s location on a single-page website/app.
After this is done, create a trigger. In Google Tag Manager go to Triggers > New > Custom Event. Enter the following settings (keep in mind that the name of the event is case-sensitive, only stateChange will work (with capital C).

If you want to learn more about a custom event trigger, read this guide.
Variable
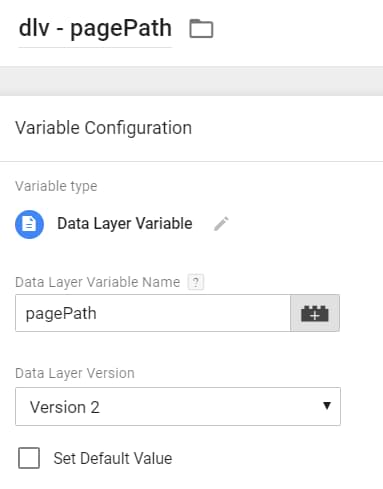
Our goal here is to fetch the value of pagePath (from that dataLayer.push) and use it in the Custom HTML tag with (Hotjar stateChange script). Since you asked a developer to pass this data to the Data Layer, you can easily read its value with the help of Data Layer Variable.
In Google Tag Manager, go to Variables > User-defined variables > New > Data Layer Variable. Enter pagePath. Leave all other settings as they are.
Custom HTML Tag
The final step of single-page website tracking, firing a Custom HTML tag with the pagePath.
Go to Tags > Custom HTML Tag > Tag Configuration and paste the following code:
<script>
hj('stateChange', '{{dlv - pagePath}}');
</script>
Notice that I used the Data Layer Variable’s name (surrounded by double curly brackets). If you used a different name for that variable, use that title (case-sensitive).
In the tag configuration section, choose the Custom Event Trigger you’ve created in the previous chapter of this guide. Save changes, refresh the GTM Preview and Debug mode and start testing.
Unfortunately, Hotjar does not have a real-time reporting feature (like Google Analytics does), so you’ll have to wait approx. several minutes) to see the result in their reports. And don’t forget, that Hotjar offers an IP exclusion feature, so don’t fall into a trap when you can’t see your sessions because of an excluded IP address.
You can learn more about manual state changes in the official Hotjar documentation.
Another chapter complete! Moving forward.
How to track events with Hotjar and Google Tag Manager?
As I have briefly mentioned that before, Hotjar offers a funnel tracking. Nothing revolutionary here but definitely useful. However, there’s one “but“. Currently, Hotjar supports only pageviews in funnels. #sadface
What about events? What if I want to track form submissions and use it as a step of my funnel?
Unfortunately, that’s not possible. Or is it?
Even though there is no such thing in Hotjar’s interface or documentation as an Event, we could apply the same technique we did in the previous chapter, tracking page views.
We’ll just turn a form submission or a button click into a fake page view and use that as a step of a funnel.
I will not go into details on how to configure a trigger properly because there are a lot of different interactions you might be interested in tracking. Nevertheless, here are some resources for further reading about triggers:
- Track form submissions with Google Tag Manager
- Track video players
- Track clicks with GTM
- Scroll tracking (by Simo Ahava)
- and many other things
Each of the aforementioned resources explains various techniques on how to create triggers, conditions when a certain tag must be fired.
Assuming that you’ve configured your trigger properly, let’s move to the tag. Once again, we’ll use a Custom HTML because the ready-made Hotjar GTM tag template is only for the basic implementation.
Go to Tags > Custom HTML > Click Tag configuration and paste the following code:
<script>
hj('stateChange', 'formSubmission'); //this will be tracked as https://www.example.com/formSubmission
</script>
Feel free to replace formSubmission with something else. Just remember that Hotjar is expecting here a Page Path, therefore it should be one word, like videoInteraction or video_interaction.
Then, assign a trigger to the tag. As I have mentioned before, I’ll not go into the trigger’s details this time. Go ahead and take a look at the list of resources I’ve shared several paragraphs ago.
Eventually, a tag could look like this:
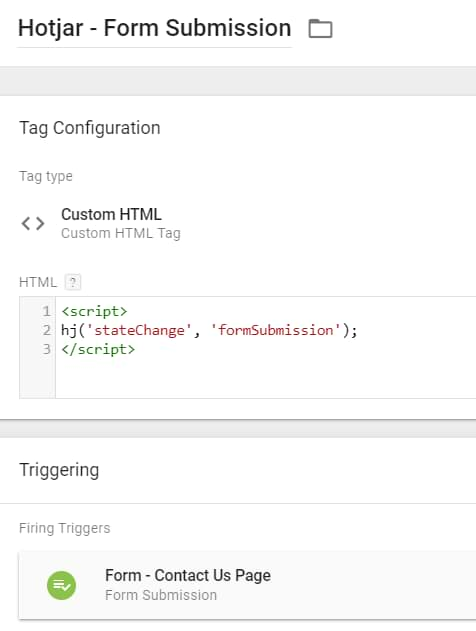
Refresh the GTM Preview and Debug mode and test if the tag fires only when it should be. Also, double-check if the data appears in Hotjar’s reports. It might take several minutes for it to be processed.
Create a funnel
Now, let’s create a funnel in Hotjar. Since the form submission is tracked as a fake page view, we’ll have no trouble building a funnel with it.
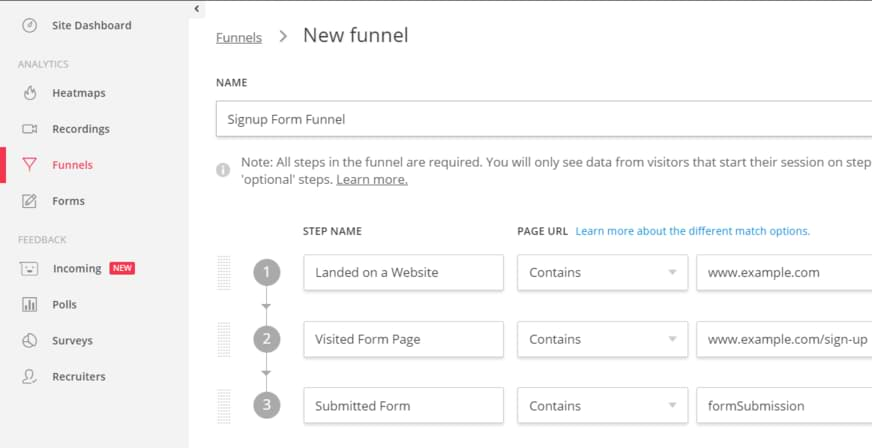
In Hotjar, go to Funnels and click New Funnel.
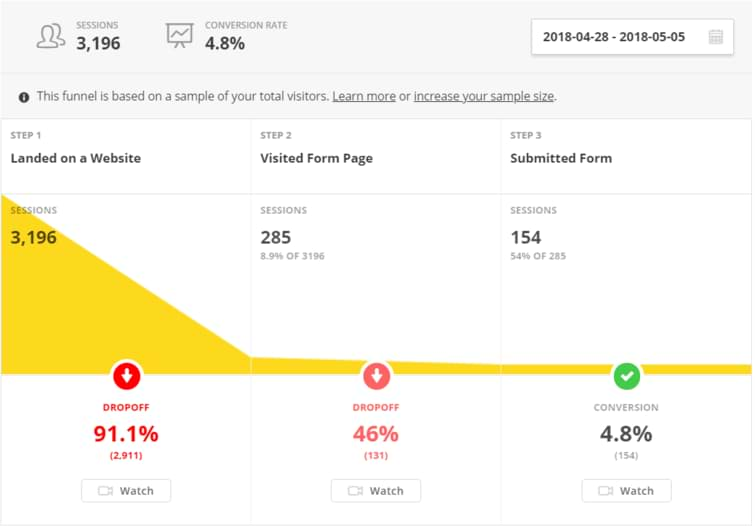
For the sake of simplicity, let’s create a funnel consisting of 3 steps:
- Landed on homepage
- Visited a page with a form
- Submitted form
Unlike Google Analytics funnels, Hotjar allows you to build them retroactively. This means that if you decide to add/remove/edit a step in a funnel, Hotjar will analyze its existing data as well.
Hit save and wait several minutes for results to appear.
How to tag Hotjar sessions with Google Tag Manager?
Note: This feature is available only for paid Hotjar Plans.
As I have mentioned before, one of Hotjar’s features is session recordings. Unfortunately, if the website attracts a lot of traffic, it will definitely become too difficult to find the right sessions to watch and you will be wasting time on the list of thousands of recordings.
That’s why you should use a filtering feature. On the right side of the list, there are a bunch of different options that can help you narrow down the search results.
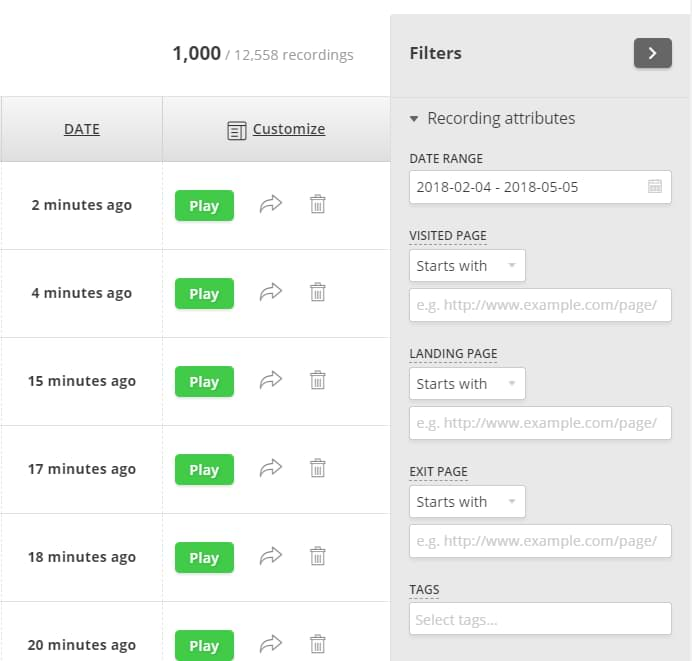
You can filter sessions by visited pages, date range, session duration, etc. However, sometimes this might not be enough. What if I want to see only sessions of users who are on a premium plan? The default page view data is not helpful here. That’s where session tagging comes in handy.
Tagging your recordings is a great way of noting specific actions, like CTA clicks, sign-ups, or visitor states (like pricing plan). Once you’ve started to tag your recordings, you’ll e able to use the Tag filter in your Recordings filter panel (on the right side). This allows you to filter through your Recordings and quickly identify issues your visitors are facing.
Feel free to read more about session tagging in Hotjar’s documentation where they explain two options, manual (from Hotjar interface) and automatic tagging (with help of JavaScript).
We’ll use Google Tag Manager for the second option, automatic tagging. In order to put a tag on a session, you’ll need the following “ingredients”:
- Some data (duh) as a variable (or multiple variables)
- Trigger (firing condition)
- Custom HTML tag
Placing and accessing data in the Data Layer
Usually, the data about the user (like Pricing plan) cannot be accessed (by default) with JavaScript (because it’s stored in the database), therefore some sort of web scraping will not help. The most robust solution is to ask a developer to push that data to the Data Layer (again, with dataLayer.push).
Here’s a sample code which should be added by the developer to the website’s code.
window.dataLayer = window.dataLayer || [];
window.dataLayer.push ({
 'pricingPlan': 'Premium' // the value should be based on the actual plan of the user
})
This snippet should be added above the Google Tag Manager container code if you want to access this data with the Page view event.
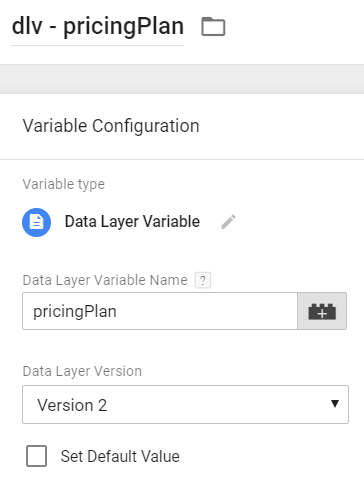
By default, Google Tag Manager does not recognize the data which is stored in the Data Layer, unless you create appropriate variables. In order to access the value of pricingPlan in the Data Layer, you need to create a Data Layer Variable with the following settings (we’ll use it later):
Firing Condition
In pricingPlan’s case, we want to send this data to Hotjar as soon as the session recording begins. But also we want to do that when the main Hotjar Tracking code was successfully fired, so what should we do?
The best option here would be to use GTM tag sequencing and I’ll explain that in a minute.
Now don’t get confused, you don’t have to use tag sequencing ALWAYS with Hotjar. No. But this time GTM tag sequencing is useful because it allows you to:
- Fire one tag (in this case, Hotjar’s main tracking code)
- If the aforementioned tag was fired successfully, fire another one (this time its Custom HTML tag which will tag Hotjar’s session).
If you want to track other interactions, like form submissions, clicks, etc., tag sequencing isn’t needed and you just can use regular triggers assigned to the Custom HTML Tag.
Ok, back to our pricingPlan example. What we’ve done so far is we asked a developer to push the pricing plan to the Data Layer. Then we created a Data Layer variable which fetches the value of the Pricing Plan.
Since we want to tag Hotjar session right after the page is loaded and Hotjar Tracking code has fired, we won’t need an additional trigger because we’ll Tag Sequencing in Google Tag Manager. You’ll understand how it works in the next chapter of this blog post.
A Tag and Tag Sequencing
According to Hotjar’s documentation, here’s a code snippet example that needs to be fired in order to tag a session with additional data.
<script>
hj('tagRecording', ['tag1', 'tag2']);
</script>
You can actually add more than one tag with a single request (just replace tag1 and tag2 with some meaningful data or variables). Heck, you can pass even 5, 10, or 20 variables, if you find that useful.
<script>
hj('tagRecording', ['tag1', 'tag2', 'tag3', 'tag4', 'tag5']);
</script>
So we’ll take this code snippet and modify a bit by keeping only one tag and replacing it with our Data Layer Variable):
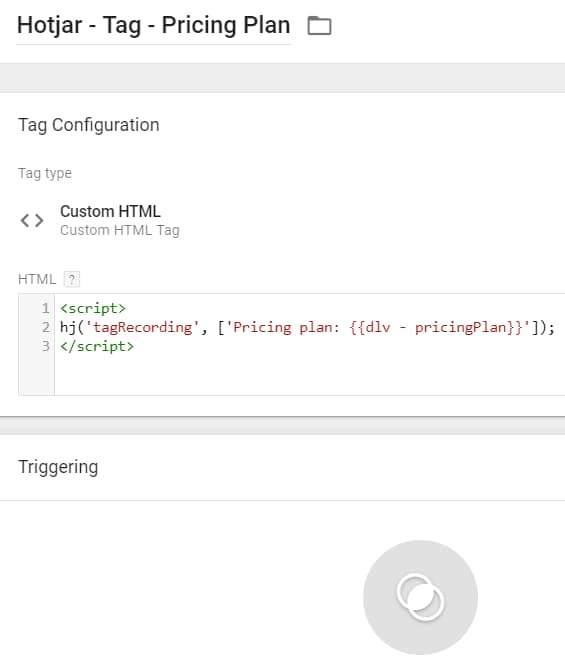
<script>
hj('tagRecording', ['Pricing plan: {{dlv - pricingPlan}}']);
</script>
When this Custom HTML tag is fired, GTM will automatically replace {{dlv – pricingPlan}} with the actual value which was available at that moment in the Data Layer.
Create a Custom HTML tag with the following settings. Don’t set any trigger because we’ll be using tag sequencing instead.
Now, let’s go back to the very first GTM tag that we created in this blog post, Hotjar Tracking Code. Open it and click Advanced Settings > Tag Sequencing.
Click the 2nd checkbox Fire a tag after….. and choose the Custom HTML tag that we’ve just created.
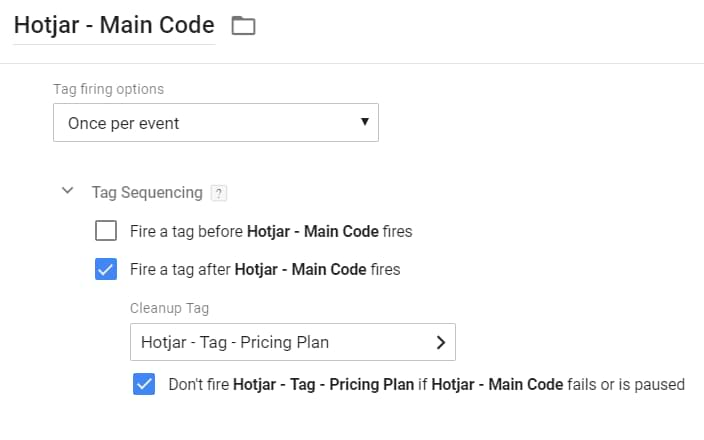
Hit save, refresh the Preview and Debug mode and check if everything fires as expected.
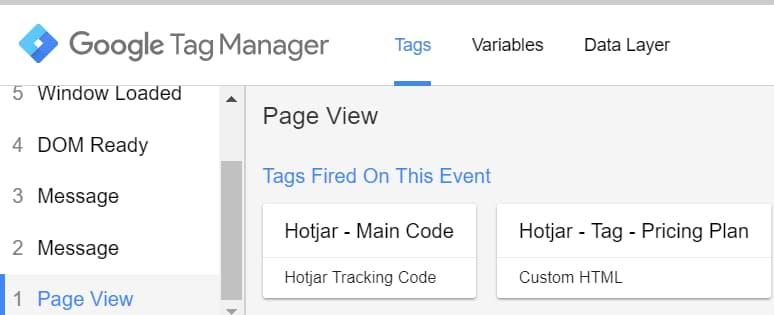
Wait for a couple of minutes and check Hotjar’s session recordings. Your tag should be added to the session.
If you start noticing many sessions without pricingPlan, you might consider firing tagRecording tag on Window Loaded trigger.
Keep in mind that Hotjar session tags can be used/seen only in session recording. You cannot build funnels based on them as Hotjar funnels are using only page URLs.
Note: If you don’t want to use Tag Sequencing, you can always use the Custom HTML tag to its full potential. In that case:
- Remove the ready-made Hotjar Tracking Code tag (you’ve created at the beginning of this post)
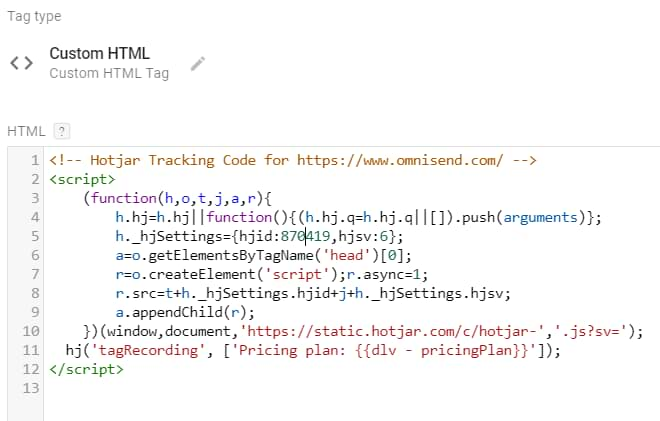
- Create a new Custom HTML Tag and paste the full Hotjar Tracking code that you can find in your Hotjar account.
- Update the code by adding an additional line of the code (right before the closing </script> tag).
hj('tagRecording', ['Pricing plan: {{dlv - pricingPlan}}']);
The final result could look like this:
Set the tag to fire on All pages.
Minor optimization
In many cases, I’m pretty sure that will want to do both, track events as page views (for funnels) and also tag sessions with those interactions (for session recordings). It will work perfectly fine if you fire both code snippets as separate GTM tags.
Page view:
<script>
hj('stateChange', 'signup');
</script>
Session Tag:
<script>
hj('tagRecording', ['Signup completed']);
</script>
However, since both codes are tracking the same interaction (just send to different reports), why not combine them into one snippet and fire as a single GTM tag? The final result could look like this. It’s a minor optimization, but this way you’ll decrease the number of GTM Custom HTML tags by 50%.
<script>
hj('stateChange', 'signup');
hj('tagRecording', ['Signup completed']);
</script>
Hotjar and Google Tag Manager: Conclusion
Hotjar is very popular analytics and feedback tool for digital marketers who want to analyze how visitors/users are browsing the website/app and converting (or not?). Thanks to Google Tag Manager, it’s pretty easy to install Hotjar and track user behavior. Here are some key takeaways from this guide:
- You can implement Hotjar’s main tracking code by using a ready-made tag template in GTM or Custom HTML tag. Both ways will work fine.
- If your website/app is working as a single-page app and the URL contains a changing hash mark (a.k.a. URL fragment), enable an additional setting in Hotjar to track it. If that does not work, you can use a hj function with stateChange argument (hj(‘stateChange’…) to manually inform Hotjar that the page has changed.
- If you want to track events with Hotjar and build funnels around them, you’ll also need to use stateChange and send “fake page views” when a particular interaction is made (a click, form submission, or something else).
- Session Tagging is a useful feature that allows you to find particular sessions faster. Use GTM to fire a function with tagRecording argument (hj(‘tagRecording’…). You can send multiple tags at the same time.
How are you using Hotjar and Google Tag Manager in web tracking? If I missed something, let me know. I’m really curious and willing to update the guide with new ideas. As always, the comment section below is at your service.
Source: analyticsmania