Introduction
Serverless deployment, the intriguing topic grabbing a lot of attention from rookies and veterans alike in the tech ecosystem is finally here. In this article we’ll be taking a practical approach to serverless deployment, also referred to as FaaS (Function as a Service). Serverless architecture, simply put is a way to build and run applications and services without managing server in infrastructure. Practical approach? We’ll be building a telegram weather bot using node.js, which will be hosted on now.
Requirements
Registering a telegram bot using BotFather
Yes! you guessed right. BotFather is also a bot. Before we go on to the nitty-gritty of coding our bot, we’ll need to create and register the bot with BotFather in order to get an API key. We’ll head over to BotFather and follow the steps outlined below to create our bot.
Setting up the project
In a directory of your choice, you’ll create a new folder that will house our bot. In that folder, we’ll initialize our project by running npm init, follow the prompts to initialize the application. In this directory, we’ll need two files index.js which will contain our base bot code and the.env file that’ll contain our environment variables.
We’ll need to install a few packages, which will come in handy while building our weather bot.
With all those dependencies installed, we’ll head over to openweathermap in other to get an API key to access weather data.
Coding our bot
As complicated as building a bot sounds, we’ll be building one in this tutorial with less than 100 lines of code. Yes! that’s possible.
Importing our packages
In the previous section, we installed a few packages. In our index.js file we’ll be importing and initializing those packages like so:
var express = require("express");
var app = express();
var bodyParser = require("body-parser");
require("dotenv").config();
const axios = require("axios");`
app.use(bodyParser.json());
app.use(
  bodyParser.urlencoded({
    extended: true
  })
);
...
Setting up the .env file
Most people will condemn our use of an env file because we have three variables in there at the moment. But hey! we can’t foresee how large our bot can get. It’s best practice to have these variables to be defined separately and properly referenced when needed. After getting our openweather and telegram API key and token, we’ll add them in our .env file like so.
OPENWEATHER_API_KEY = XXXXXXXXXXXXXXXXXXXXX
OPENWEATHER_API_URL = "http://api.openweathermap.org/data/2.5/weather?q="
TELEGRAM_API_TOKEN = XXXXXX:XXXXXXXXXXXXXXX
Major keystrokes
After defining our environment variables and importing our packages, we’ll go on to writing our bot’s base logic. Our bot will make use of three major methods, namely:
Before we code these methods, we’ll define two major URL endpoints, our telegram API endpoint and the openweathermap endpoint.
let telegram_url = "https://api.telegram.org/bot" + process.env.TELEGRAM_API_TOKEN +"/sendMessage";
let openWeatherUrl = process.env.OPENWEATHER_API_URL;
/start_bot is our apps endpoint, which will be hooked onto the telegram API webhook, we’ll talk about this in when our bot is ready for deployment.
app.post("/start_bot", function(req, res) {
const { message } = req.body;
let reply = "Welcome to telegram weather bot";
let city_check = message.text.toLowerCase().indexOf('/');
if(message.text.toLowerCase().indexOf("hi") !== -1){
    sendMessage(telegram_url,message,reply,res);
}else if( (message.text.toLowerCase().indexOf("check") !== -1) && (city_check !== -1 ) ){
    city = message.text.split('/')[1];
    get_forecast(city).then( response =>{
        post_forecast(telegram_url,response,message,res)
    });
}else{
    reply = "request not understood, please review and try again.";
    sendMessage(telegram_url,message,reply,res);
    return res.end();`
}
});
...
Surprisingly that’s all that defines our bot in 18 lines. How does our work?.
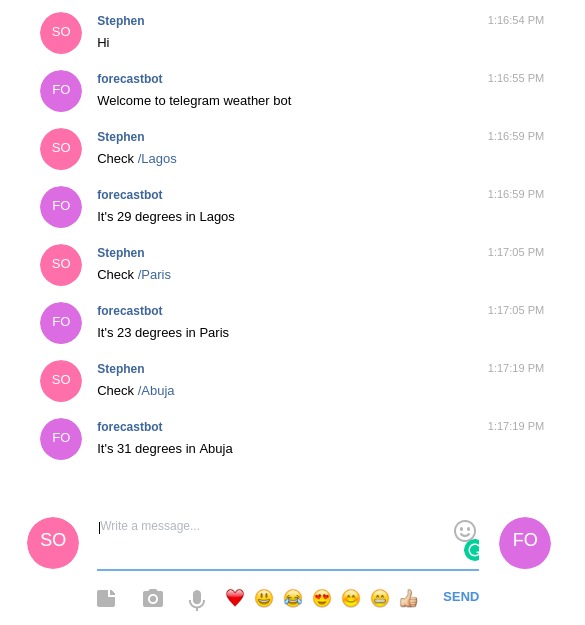
To get a weather forecast, all we need do is send Check /Lagos, it then returns it’s 232 degrees in Lagos. So it looks out for a keyword Check and gets the city, which is stated after the /.
Demystifying the 18 lines
In the first four lines, we’re parsing our request body and storing it inside a message object. We’ll then initialize our welcome message inside the reply variable and check if the text coming from the user contains a forward slash. Following these four lines are three conditions, with the first checking if the message is a simple “Hi” or “hi”, if it is, the sendMessage(); method is invoked. This method accepts four parameters which you can see in the code above. The second condition checks if the incoming message contains the check keyword and also contains a city. If this condition evaluates to be true, it calls the get_forecast(); method which returns a response which is a promise we’ll pass to our post_forecast(); method. This method is what replies the user with the current weather conditions.
If you got that, which I know you did, can I get an air high five?

Great! going forward, we’ll discuss the three methods mentioned above in detail.
function sendMessage(url, message,reply,res){
axios.post(url, {`chat_id: message.chat.id,`
    text: reply
}).then(response => {
    console.log("Message posted");
    res.end("ok");
}).catch(error =>{
    console.log(error);
});
}
...
function get_forecast(city){
let new_url = openWeatherUrl + city+"&appid="+process.env.OPENWEATHER_API_KEY;
return axios.get(new_url).then(response => {
let temp = response.data.main.temp;
//converts temperature from kelvin to celsuis
temp = Math.round(temp - 273.15);
let city_name = response.data.name;
let resp = "It's "+temp+" degrees in "+city_name;
return resp;
}).catch(error => {
console.log(error);`
});
}
...The resp variable contains a formatted message to be sent to the user.
Yeah we didn’t forget, our app will be listening in on port 3000
app.listen(3000, () => console.log("Telegram bot is listening on port 3000!"));
Deploying our bot with Now
As a rule of thumb, telegram bots are deployed over SSL, which now provides. Now is a platform which allows you to host your node applications with ease. You can head over to Zeit.co if you want to know more about Now. Now we’ll install one last package in our project.
npm install -g now, this command installs the now CLI package. When the installation is done, we can take our application to the cloud by just typing now in our terminal. When the installation is done, we’ll be provided a URL which will be used to create our webhook using cURL like so:
curl -F "url=https://URL_FROM_NOW/start_bot" https://api.telegram.org/botYOUR_TELEGRAM_API_TOKEN/setWebhookIf successful, you should get this JSON response:
{
    "ok":true,
    "result":true,
    "description":"Webhook was set"
}
Conclusion
In this tutorial, we’ve built a telegram bot using node.js and also introduced to serverless deployment with now.
There’s a lot of cool improvements that could be done with the bot. Feeling adventurous? Fork the project on GitHub, submit a PR and tinker with your little creation.
Source: Scotch.io