Here’s a situation: you want to track form submissions on a website. There are multiple forms and they all redirect the visitor to the same “Thank you” page. The built-in Form Submission trigger in GTM is not working, thus you could try implementing the Thank you page tracking method. But how can you distinguish which form was submitted?
In this guide, I’ll show several options on how to track many forms with one Thank you Page (in other words, that redirect the same ‘Thank you” page).
Table of contents
+ Show table of contents +
- Option #1. Using the referrer variable
- Option #2. Working with a single page application? Use Trigger Groups
- Option #3. Another option for Single Page Applications
- Option #4. Store the info of the last submitted form in a cookie
- Option #5. Can you change the URL of the Thank you page yourself?
- Option #6. Cooperate with developers
- How to track multiple forms with one Thank You page: Final Words
Option #1. Using the referrer variable
This method is useful if there is only one form per page.
If the page with a form and the Thankyou page is one the same subdomain, there are high chances that you can use a built-in Referrer variable in Google Tag Manager. This variable returns the value of the previous page.
However, keep in mind that this variable becomes more and more limited (due to privacy implications). If your “Thank you” page is on another domain, the Referrer might not return a full URL, which means that you will not be able to distinguish from which exact page did the visitor land.
To check if this method works (ideally, do this on several browsers):
- Enable GTM preview and debug mode mode
- Refresh the website with the form you are about to track
- Submit the form (and get redirected to a thank you page)
- Check the Container Loaded event in the preview mode > go to Variables tab of the debug console and check the value of the Referrer
Can you tell (by looking at it) from which exact page did the visitor land on a “Thank you” page? If yes, then this method is exactly what you need. If not, skip to the option #2.
It’s time to track the form submission. Let’s say that the URL of the “Thank you” page is this https://www.example.com/thank-you/. Let’s create a trigger.
#1.1. Create a Trigger
In GTM, go to Tags > New > Pageview and enter the following conditions:
- Page Path starts with /thank-you
- Referrer contains www.example.com (replace this with your website’s domain). This is optional but if someone accidentally lands on a “Thank you” page from Google search or somewhere else (not from my website’s other page), this condition will prevent the tag from firing.

#1.2. Create a Google Analytics tag
In GTM, go to Tags > New > Universal Analytics and enter the following settings:
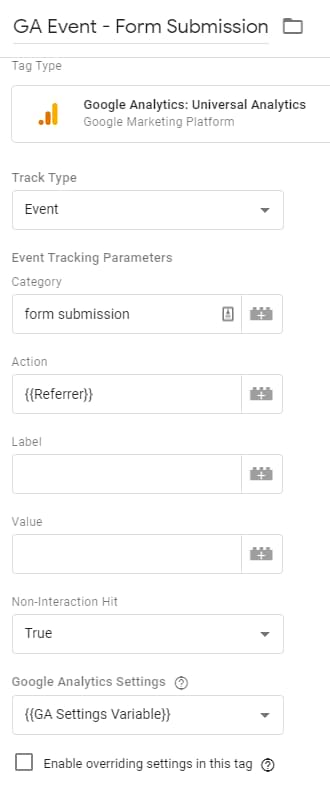
You can use a different naming convention if you wish. The main thing here is that in event action, we are sending the URL of the previous page (on which the form was submitted).
If you want to track only the Pathname of the Referrer (not the full URL), you can create a URL variable with the following settings and use it in your GA tag instead.

#1.3. Test the setup
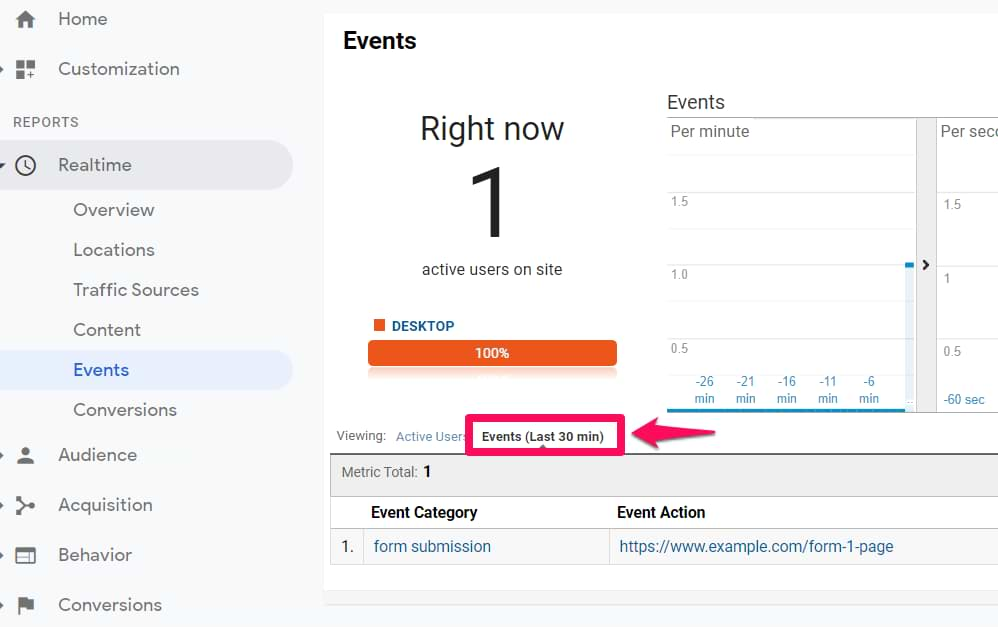
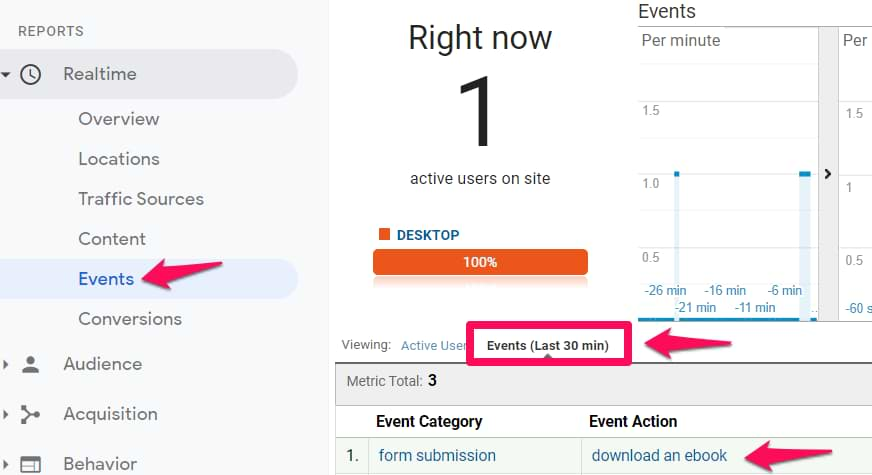
Save all the changes, refresh the GTM preview and debug mode, and submit the form once again. Then go to Google Analytics real-time reports and check whether you see the event in Realtime > Events.
Note: if you set the “non-interaction hit” to true, you will be able to see the real-time event data only in the “Last 30 minutes” section.
After you check and make sure that everything is working properly, don’t forget to publish the container.
Option #2. Working with a single page application? Use Trigger Groups
Note: the solution that I’m about to show you is not very scalable (unless you could ask a developer to pass some additional info to the Data Layer. More on that – later). If you have just several forms and the number of them is not expected to grow fast, go ahead and use it. Otherwise, move on to another method.
If you are dealing with a Single Page Application, then you can consider using Trigger Groups. This feature allows you to combine several triggers. If they all fire on the same page, then the trigger group is activated and all associated tags are activated as well.
Here’s the main idea:
- A visitor lands on a form “page” of your SPA. Trigger A is activated.
- A visitor lands on a “Thank you” page. Trigger B is activated.
If we include both triggers in a single Trigger group, then your GA Event Tag could fire.
The reason why I put the word “page” into quotation marks is that Single Page application tracking usually involves Virtual Pageviews. Every time a visitor navigates from one section of your SPA to another, a virtual pageview is sent to Google Analytics.
There are various ways of how this can be implemented.
Let’s imagine that in my case, I have asked a developer to push the information on every page to the Data Layer. That information looks like this:
window.dataLayer = window.dataLayer || [];
window.dataLayer.push({
  'event' : 'virtualPageview',
  'pageTitle' : 'Some page title',
  'pagePath' : '/pages/some-page-with-form'
});
Then I have created two Data Layer variables (for the pagePath and pageTitle) and a Custom Event Trigger for the “virtualPageview”.
That custom event trigger fires a GA pageview tag on every “virtualPageview”. But in our case (of tracking multiple forms and a single thank you page), this is too broad. We need to go deeper.
Let’s imagine one more thing in this example. There are two virtual pages with forms:
- /pages/download-an-ebook/
- /pages/download-a-checklist/
…and one “Thank you” page /pages/thank-you/.
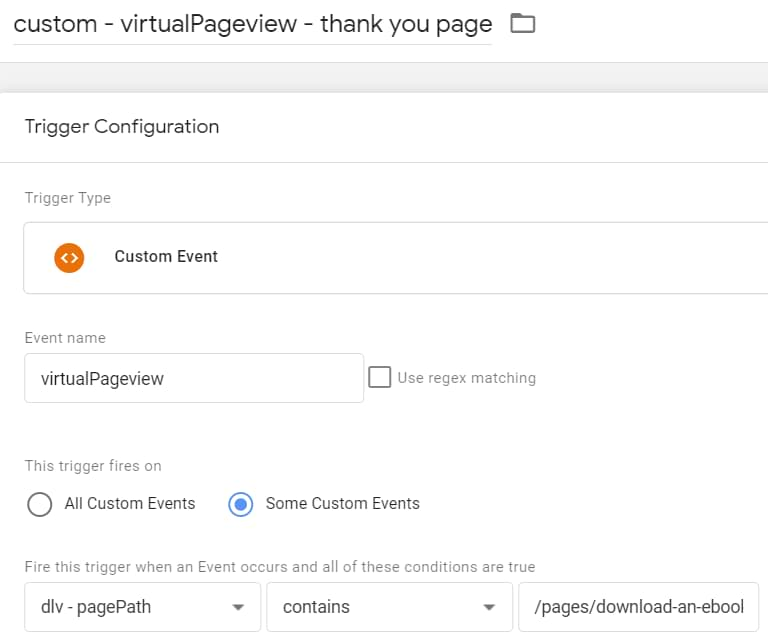
#2.1. Triggers
Now, let’s create triggers (warning: you’ll need to adapt the settings of the triggers to your project because there is a lot of flexibility/uniqueness in setups of every SPA). One for the “Thank you” page:

And then create one for EACH form. Here’s an example of one trigger. Basically, I just enter the custom event name that represents a virtual pageview and then make it more precise by entering the form’s URL (pagePath or whatever you are using in your setup)
#2.2. Trigger groups
Then it’s time for trigger groups. Since we have two forms, we’ll need two trigger groups. Go to Triggers > New > Trigger Group. Here’s an example of one trigger group. In it, I included two triggers: one for the “Thank you” page and one for pageview related to a specific form.
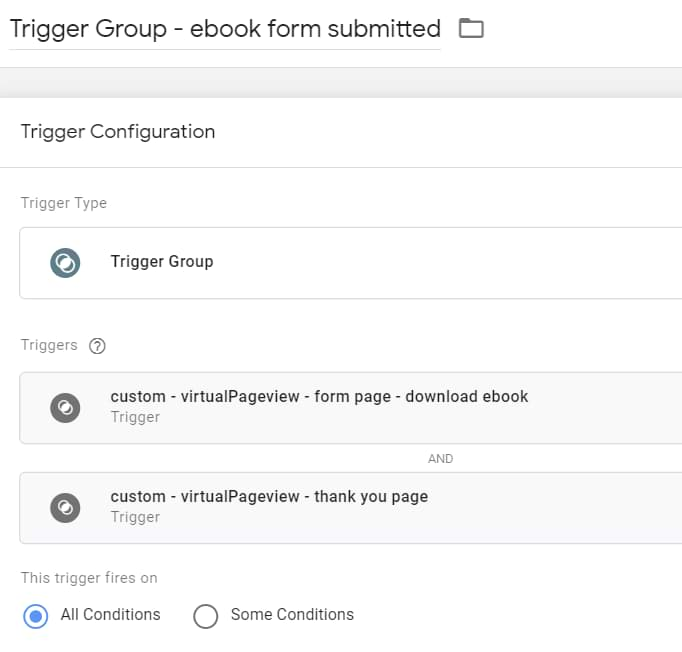
You will need to create a separate trigger group for EVERY form you wish to track in your Single Page Application.
#2.3. Tags
Then, finally, create two tags (one for each form). The more forms you have, the more tags you’ll need to create. Assign one tag to one trigger group. Here’s an example of one tag.

#2.4. Test the setup
Save all the changes, refresh the GTM preview and debug mode, and submit the form once again. Then go to Google Analytics real-time reports and check whether you see the event in Realtime > Events.
Note: if you set the “non-interaction hit” to true, you will be able to see the real-time event data only in the “Last 30 minutes” section.
After you check and make sure that everything is working properly, don’t forget to publish the container.
As you can see, this setup is not very scalable and can quickly clutter your container if you have many forms. For example, if you had 10 forms, you’d need to create 11 triggers, 10 trigger groups, and 10 tags. Not an ideal solution 
But for small websites, this still might be an option.
Option #3. Another solution for Single Page Applications
This depends on how are you tracking virtual pageviews with GTM. If you are using the History Change trigger, chances are that you already have information about the previous page in the Data Layer. Or maybe your developer is already pushing the previous page’s info to the Data Layer?
However, this heavily depends on how your SPA is coded.
Anyway, open your Single Page Application, submit the form, and when you are moved to the “Thank you” page, check the Data Layer tab of your Preview and Debug mode.
See something related to the previous page with a form?

If yes, use the Data Layer variable to pull that value. Or maybe built-in variables Old History Fragment or Old History State work for you? If yes, then:
- Create one Custom Event Trigger (or history change trigger — this depends on your existing setup) that fires when the visitor sees that “Thank you” page. Check the previous chapter of this blog post to learn more.
- Then create a GA Event tag, set it to fire on the Custom Event Trigger you’ve just created. Also, in the Event Action or Event Label field, insert the variable that returns the info about the previous page the visitor saw (I’m talking about the data layer variable or one of the history variables).
#3.1. Test the setup
Save all the changes, refresh the GTM preview and debug mode, and submit the form once again. Then go to Google Analytics real-time reports and check whether you see the event in Realtime > Events.
Note: if you set the “non-interaction hit” to true, you will be able to see the real-time event data only in the “Last 30 minutes” section.
After you check and make sure that everything is working properly, don’t forget to publish the container.
Option #4. Store the info of the last submitted form in a cookie
This method works if a Thank You page is on the same domain as the page where the form was submitted. Subdomains don’t matter. If the form is available on www.example.com and the Thank you page is on app.example.com, that’s fine.
Also, this method is useful if the Referrer, for some reason, is not available or just does not give us enough info.
Here’s what we will do:
- When a form is submitted, we’ll store some information about the submitted form in a cookie. Examples: URL where the form is available, form ID, etc.
- When a visitor lands on a Thank you page, we’ll read the cookie and use that info in our GA Tag.
The reason why I am not using localStorage is that it is limited just to a single subdomain. And sometimes, thank you pages are hosted on a different subdomain of the same domain.
#4.1. Set the cookie
There are several ways how to set the cookie in Google Tag Manager (Custom HTML tag, Custom Template). In this case, I’ll use the Custom HTML tag.
<script>

 var cookieName = "gtm_formInfo"; // Name of your cookie
 var cookieValue = "REPLACE THIS"; // Value of your cookie, we'll need to replace this
 var expirationTime = 86400; // 24 hours in seconds
 expirationTime = expirationTime * 1000; // Converts expirationtime to milliseconds
 var date = new Date();
 var dateTimeNow = date.getTime();

 date.setTime(dateTimeNow + expirationTime); // Sets expiration time (Time now + one month)
 var date = date.toUTCString(); // Converts milliseconds to UTC time string
 document.cookie = cookieName+"="+cookieValue+"; SameSite=None; Secure; expires="+date+"; path=/; domain=." + location.hostname.replace(/^www./i, ""); // Sets cookie for all subdomains

</script>
We need to insert some value about the form in this code. What kind of info do you have? If there is only one form per page, you can use the Page Path variable. If you have another useful variable, feel free to use that.
The final code with the {{Page Path}} info will look like this
<script>

 var cookieName = "gtm_formInfo"; // Name of your cookie
 var cookieValue = {{Page Path}}; // Value of your cookie
 var expirationTime = 86400; // 24 hours in seconds
 expirationTime = expirationTime * 1000; // Converts expirationtime to milliseconds
 var date = new Date();
 var dateTimeNow = date.getTime();

 date.setTime(dateTimeNow + expirationTime); // Sets expiration time (Time now + one month)
 var date = date.toUTCString(); // Converts milliseconds to UTC time string
 document.cookie = cookieName+"="+cookieValue+"; SameSite=None; Secure; expires="+date+"; path=/; domain=." + location.hostname.replace(/^www./i, ""); // Sets cookie for all subdomains

</script>
This code will set the cookie that will expire in 24 hours (unless the visitor submits another form — then the previous value will be overwritten).
You can fire this code when, say, the submit button is clicked.
I know, I usually advocate that tracking forms with the Click Trigger is a terrible idea but in this case, we are not sending any data to GA yet. We are just storing the information about the most recent intention to submit a form.
Here is an example of the Click Trigger (if the button’s class is form-submit-button). Learn more about click tracking.
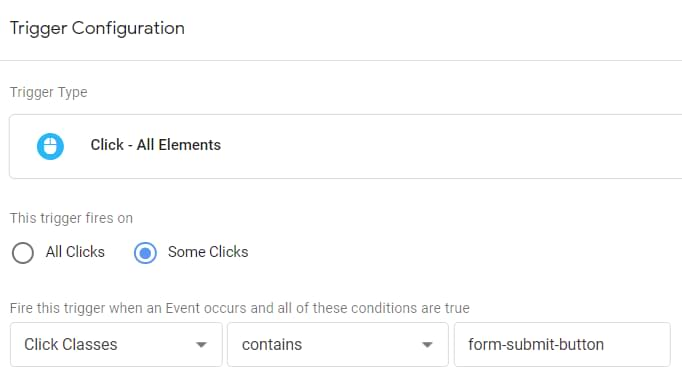
Yes, the example above might be too broad. Having an ID on a button would be a much better option (or some additional data attributes) but look at this more as a proof of concept. Assign this trigger to the Custom HTML tag.
#4.2. Check the cookie
After you have saved the trigger and the tag, enable/refresh the Preview and Debug mode in GTM and check whether this is working. Click on a Form submit button.
The Custom HTML tag should be activated on a Click Event. If yes, open the Developer Tools of your browser and then go to Application > Storage > Cookies > Select your domain. Then enter gtm_formInfo in the search bar and check if the cookie is there.

Note: the screenshot above is taken from my Chrome. Other browsers will have a little different interface/naming.
#4.3. Create a 1st party cookie variable in Google Tag Manager
Go to Variables > New > 1st Party Cookie variable and enter the following settings (case-sensitive):
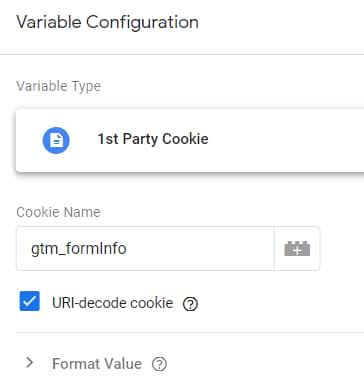
This variable will read the cookie you’ve just set in the previous section of this article.
#4.4. Create a trigger
Create a Pageview trigger that will be activated on a “thank you” page. Say, that the URL of your Thank you page is example.com/pages/thank-you/. In that case, the settings of the trigger could look like this:

#4.5. Create a tag
Last but not least, the tag. We need to send the form submission data to Google Analytics. When a visitor lands on a “Thank you” page, the trigger will activate the tag. Here are the settings of that tag:

You can use a different naming convention if you wish. Assign the previously created Pageview trigger to this tag.
So, to sum up: when a visitor clicks the Form Submit button, we will store the Page Path in a cookie. When the visitor lands on a “Thank you” page, we’ll take the info of that cookie and use it in the GA Event Tag.
#4.6. Test the setup
Save all the changes, refresh the GTM preview and debug mode, and submit the form once again. Then go to Google Analytics real-time reports and check whether you see the event in Realtime > Events.
Note: if you set the “non-interaction hit” to true, you will be able to see the real-time event data only in the “Last 30 minutes” section.
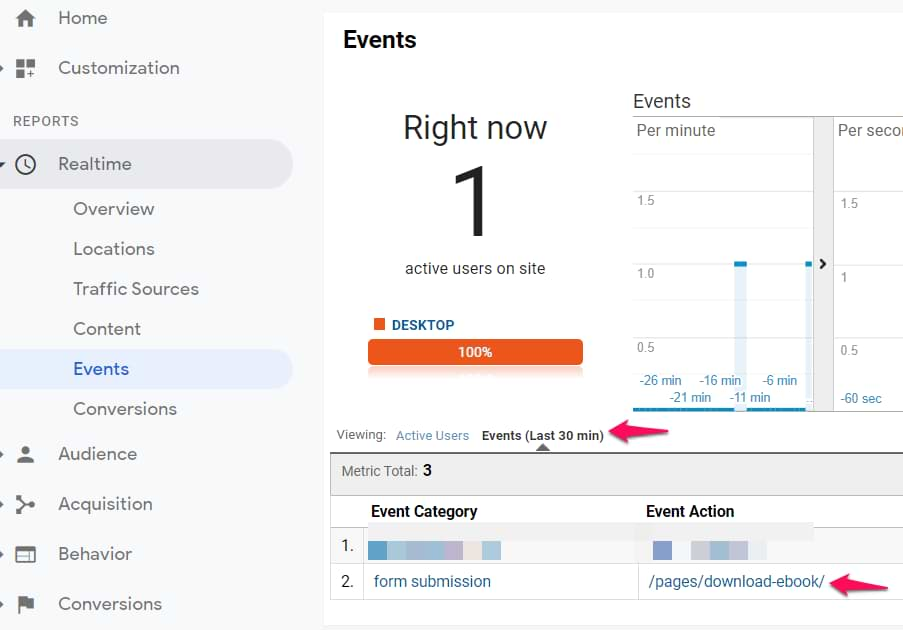
After you check and make sure that everything is working properly, don’t forget to publish the container.
Option #5. Can you change the URL of the Thank you page yourself?
The following tracking method is a good option if:
- You are using a flexible form plugin that allows you to change the URL of a “Thank you” page on for every single form individually.
- AND the number of new forms isn’t growing very rapidly
- AND if the number of existing forms is not crazy high
So, here is the deal. You’ll still be using the same “Thank you” page. But instead of a regular /thank-you/ address you will also add a URL parameter to it, for example formName. While “Thank you” page is the same, the URL will be slightly different for each form.
For example, if you have a Thank you page of which URL is example.com/pages/thank-you/ but you have 5 forms, the Thank you page URL of each form could look like this:
- example.com/pages/thank-you/?formName=form1
- example.com/pages/thank-you/?formName=form2
- example.com/pages/thank-you/?formName=form3
- example.com/pages/thank-you/?formName=form4
- example.com/pages/thank-you/?formName=form5
You can choose any other (more meaningful value) instead of just “form1”. What we are going to do next is to create a URL Variable that will return the value of formName and we will use it in the GA Event Tag.
Now go through every form on your website and change the URL of the “Thank you” page. I will not provide instructions here because every form plugin or content management system (CMS) will require different steps.
#5.1. Create a URL variable
In GTM, go to Variables > New > URL variable and enter the following settings:
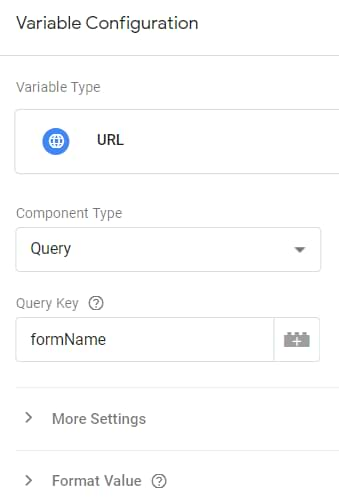
If you are using a different parameter name (instead of formName), enter it in the variable’s settings.
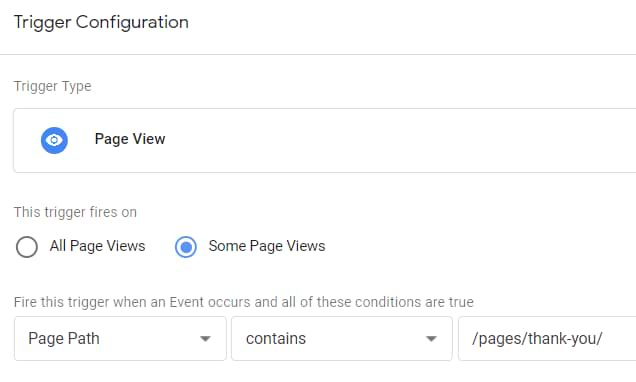
#5.2. Create a Trigger
Once again, we will be using the same Pageview trigger that I mentioned several times in the previous sections. If we follow the URL example I previously mentioned (https://example.com/pages/thank-you/), your trigger settings could look like this:
#5.3. Create a Tag
Go to Tags > New > Universal Analytics and enter the following settings:
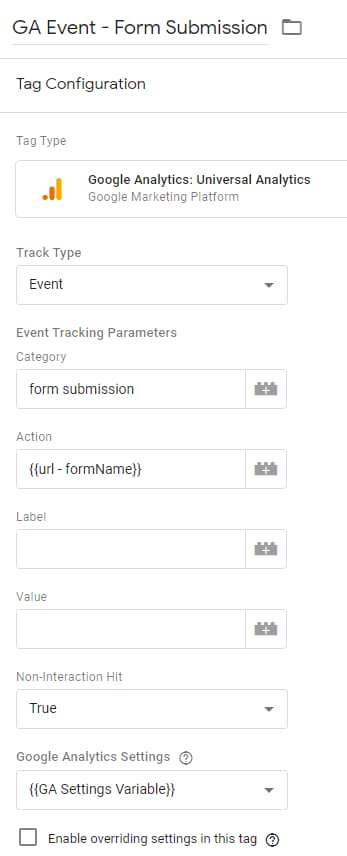
This tag will be fired when a visitor lands on a “Thank you” page. In the “Event Action” field, I inserted the previously created URL Variable. It will return the value of the formName parameter that is visible in the URL of every Thank you page.
#5.4. Test the setup
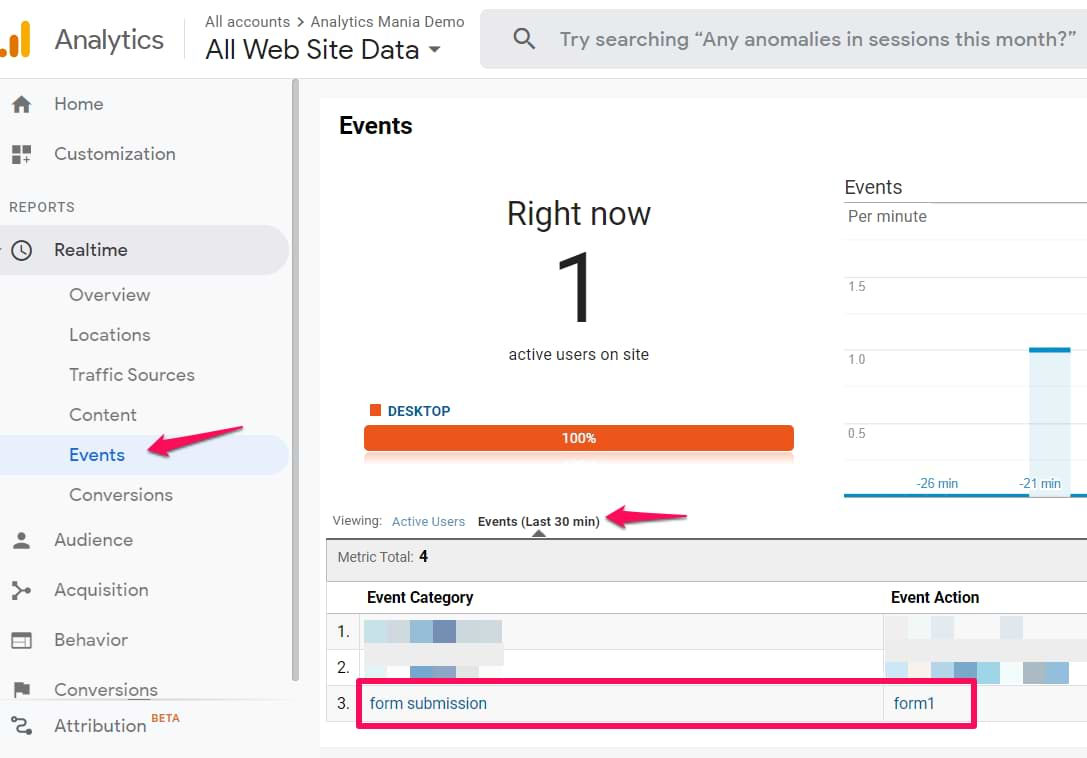
Save all the changes, refresh the GTM preview and debug mode, and submit the form once again. Then go to Google Analytics real-time reports and check whether you see the event in Realtime > Events.
Note: if you set the “non-interaction hit” to true, you will be able to see the real-time event data only in the “Last 30 minutes” section.
After you check and make sure that everything is working properly, don’t forget to publish the container.
Option #6. Cooperate with developers
If none of the previously mentioned options worked for you, you should ask for the developer’s help. Here are several options that come to my mind right now:
- Ask a developer to decorate the URL of every “Thank you” page. Ask him/her to include a certain parameter that would indicate which form was submitted. This is pretty much the method #5 from this blog post. The main difference is that maybe you are working on a site where you cannot change the URLs by yourself, thus ask for the developer’s help.
- Ask a developer to push the information about the form submission to the Data Layer of the “Thank you” page. Here is a sample code that your developer could implement:
<script>
window.dataLayer = window.dataLayer || [];
window.dataLayer.push({
 'event': 'formSubmission',
 'formName': 'some form name' //this should be replace with an actual form name
 });
</script>
When this is done, then you should create a custom event trigger, Data Layer Variable and a GA Event tag.
Custom Event Trigger’s settings:
- Trigger title – custom – formSubmission
- Event name – formSubmission
- Fire on all custom events
Data Layer Variable’s settings:
- Title – dlv – formName
- Data Layer Variable name – formName
- Version 2
Finally, create the GA Event Tag with the following configuration, assign the previously created Custom Event Trigger, insert the Data Layer Variable (it is surrounded by {{ }})
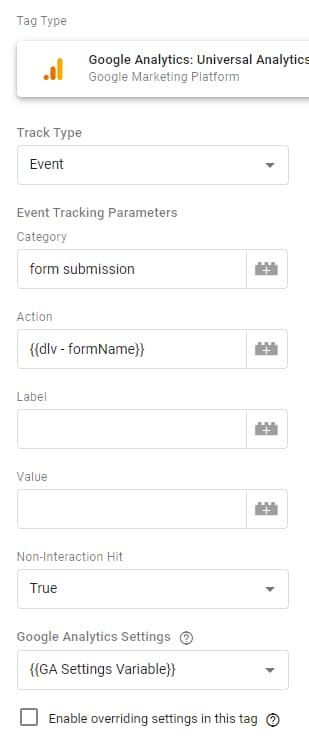
#6.1. Test the setup
Save all the changes, refresh the GTM preview and debug mode, and submit the form once again. Then go to Google Analytics real-time reports and check whether you see the event in Realtime > Events.
Note: if you set the “non-interaction hit” to true, you will be able to see the real-time event data only in the “Last 30 minutes” section.

After you check and make sure that everything is working properly, don’t forget to publish the container.
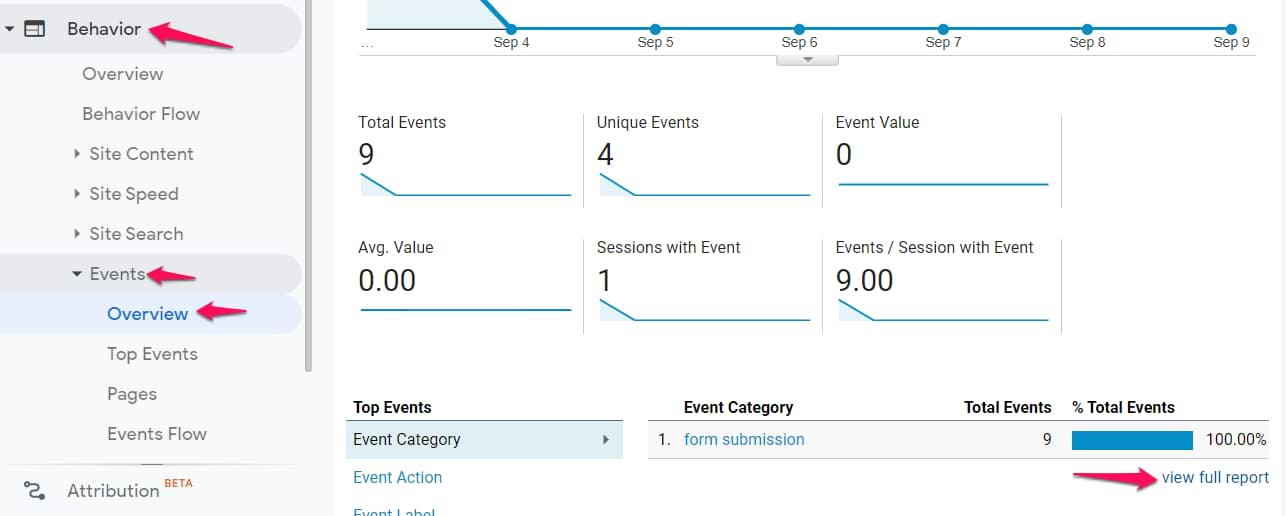
Where can I find this data in my regular Google Analytics reports?
All of these events will appear in Behavior > Events > Overview and then click the View Full Report link.
How to track multiple forms with one Thank You page: Final Words
And there you have it. If you are dealing with multiple forms that redirect a visitor to the same “Thank you” page, hopefully, one of these methods will help.
Personally, I’d try working with the Referrer variable first (because it requires less work compared to other methods).
If that does not work, then I’d go with storing the info in a cookie or editing the URLs of a Thank you page (by adding some parameter). Or keep looking for the info about the previous page in the Data Layer.
If none of that worked, then I would probably cooperate with developers closer.
Other methods should be considered as plan B.