Everybody wants to have a low bounce rate in Google Analytics. This phrase was recently said in the Google Tag Manager community by one of our members. The quick discussion was about whether particular events in Google Analytics should be tracked as interactions or not because the choice impacts the bounce metric.
The truth is that bounce rate isn’t that important, after all. I mean, it is (to some extent). But not that much as some of you might be thinking. Unfortunately, many marketers still take the metric way too seriously. I’ve seen some them even using it as a KPI(!!!).
While bounce rate can give you some valuable insights on whether the visitors are engaging with your content/page, it also makes inexperienced people focus on the wrong things. Instead of improving what really matters (content, offer, pricing, UX, etc.) they just blindly try to reduce the bounce rate, often manipulating it.
As a result, bounce rate has become a meme in the analytics community, giving birth to such masterpieces (seriously, this website is awesome).
My main point so far is that the response to Everybody wants to have a low bounce rate is that’s not how people should think. I mean, many marketers want it, but they often make a wrong choice by adjusting the metric and making it too low. Consequently, such actions will mask the real insights that you could draw. If all your pages have ~20% bounce rate, what does it mean? Probably, not much.
On the other hand, not all Google Analytics tracking setups with low bounce rate are the result of greed or blind pursuit of the “KPI”. It also pretty often means that there’s something wrong with the implementation itself. In this guide, I’ll explain the most common (from my experience) cases, where the bounce rate is destroyed (accidentally or intentionally), how to debug them and how to fix things.
Let’s dive in.
Quick basics: what is bounce rate?
Before we continue, I’d like to take a quick step back and remind (mainly for beginners) what a bounce rate is in Google Analytics and how is it calculated. This will help you understand why is it so easy to manipulate the metric in the first place.
In short, a bounce rate is the percentage of single-interaction sessions on your web page.
In other words, a visitor landed on your site, did nothing (i.e. did not interact with the content), and then left.
I will not get into more details about the definition of bounce rate, because that could be another 5000+ word blog post. But you get the idea, right?
- 1 interaction (e.g. page view) = bounce.
- 2+ interactions = no bounce.
How is a bounce rate calculated in Google Analytics?
Let’s get back to theory for a moment.
Google Analytics calculates and reports the bounce rate of a web page (1) and bounce rate of a website (2).
- A bounce rate of a web page = total number of bounces (when people left) on a page (in a given time period) / total number of entrances on the page (in the same period of time)
Example: 100 people entered the page A and 80 people left your website on the page A. Bounce rate of a web page will be equal to 80 / 100 *100% = 80% - A bounce rate of a website = total number of bounces across all the pages on the website (in a given time period) / total number of entrances across all the pages on the website (in the same time period)
Example: Yesterday there were 4000 entrances to the website, and 3000 ended up bouncing. A bounce rate of a website will be equal to 3000 / 4000 *100% = 75%
If a visitor lands on a page, that counts as a page view. If he/she navigates to another page of your website, another page view occurs (which is counted as interaction). Great! Your website’s bounce rate has decreased a bit because there were two interactions.
Let’s imagine another scenario. Your website consists of very long (5000+ words) blog posts. They are super useful and visitors adore them. But once they read it, they close the browser or switch to another tab.
Why? Probably because it was a bit exhausting for them to invest their time and effort to read the entire blog post. Now, they have to do something else (take a break, go drink a coffee, or finish some task, or whatever).
By default, this kind of session would be counted as bounce in Google Analytics. 1 page view –> Exit. But in reality, that visitor thoroughly read your blog post, clicked a few images to zoom, etc. Actually, there were interactions, you just didn’t track them.
That’s why by capturing more events (like clicks, video player interactions, etc.) on your website you can result in a bit more accurate bounce rate.
Another thing that will change in Google Analytics due to event tracking is session duration. In GA, the session duration is calculated as the time difference between the first and the last hit (e.g. a pageview or an event). So if a visitor lands on a page, after 60 seconds completes a certain interaction, e.g. click (that is tracked by GA) and then leaves after another 30 seconds, Google Analytics will report that the session duration was 60 seconds because that’s the time difference between the initial page view and the click.
To sum up, the number of interactions (e.g. page views or events) during a session affect the bounce rate and session duration. So if your Google Analytics implementation isn’t correct or if you’re tracking even unnecessary things on a page as interactions, those metrics will be affected.
The most common reasons why you have a low bounce rate in GA
I’ve prepared a list of the most popular causes that affect the metric. Here they are (in no particular order):
- Double tagging
- Poor migration from hardcoded GA to GA via GTM
- Some e-commerce hits fire together with a pageview
- Some other events are fired together with a page view
- In the single-page application, the virtual pageview is sent right after a regular pageview
- Scroll-tracking are tracked as interactions
- (Dis)honorable mention:
Each reason will be followed by steps of how to check it and fix.
#1. Double tagging
Double tagging means that there are two same Google Analytics tracking codes and each one of them sends a pageview. Remember the definition of a bounce rate? Two pageviews = two interactions (hits) = 0% bounce rate.
#1.1. Debugging and fixing
Although there are many ways to check this, here are several easiest ones (IMHO):
- By using the Tag Assistant Chrome extension
- Checking GA real-time reports
- By using the dataLayer Inspector+ Chrome extension
Tag Assistant. Install the extension LINK, click its icon and then the Enable button. Refresh the page that you’re debugging (P.S. if you need to learn more about the extension).
The number in the extension’s icon will change. Click it and if the Google Analytics tag is marked as yellow, click it. ![]()
If you see the Same web property ID is tracked twice alert, then you need to remove one of them. If both GA Pageview tags are controlled via GTM, log in to your Google Tag Manager account and then remove one. In order to check this hypothesis, you should enable the GTM Preview and Debug mode and see which GA Pageview tags have fired on that page.
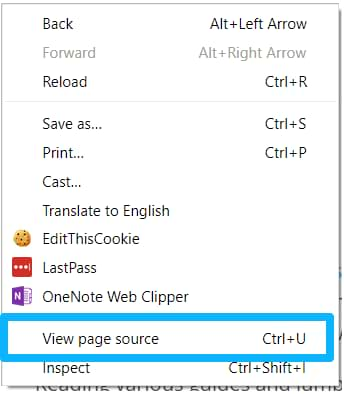
If one or more GA tracking codes are implemented directly in the website’s source code, you’ll need to ask a developer to remove one. Usually, GA (analytics.js or gtag.js) codes can be seen in View page source mode. In chrome, do the right-click anywhere on website’s background and choose View page source.
Google Analytics real-time reports. For this method, I use my Sandbox view in a GA property that includes only the data from my IP address.
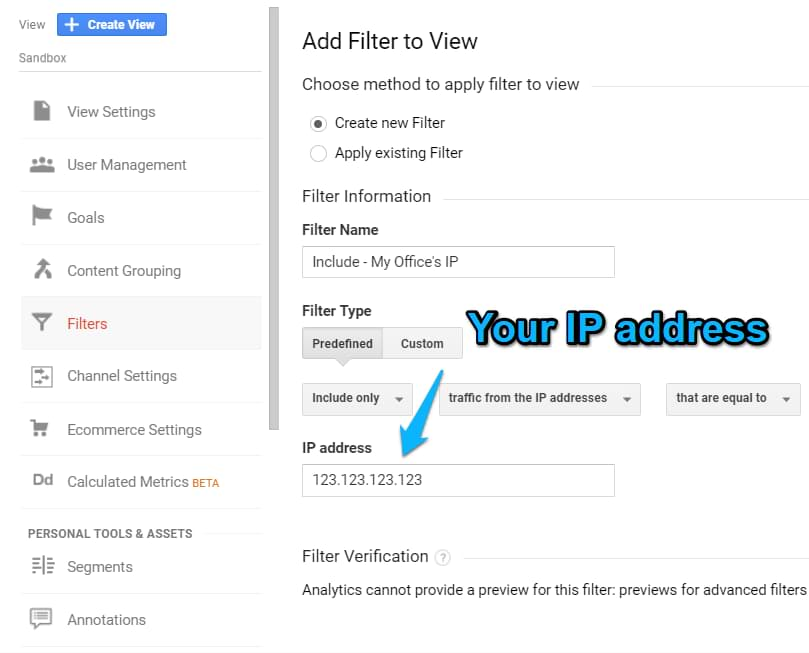
After you have it set up in your GA account, go to the correct property > Real-time > Overview. How many visitors are there? If you’re working alone from that IP, then you’ll be able to properly test this.
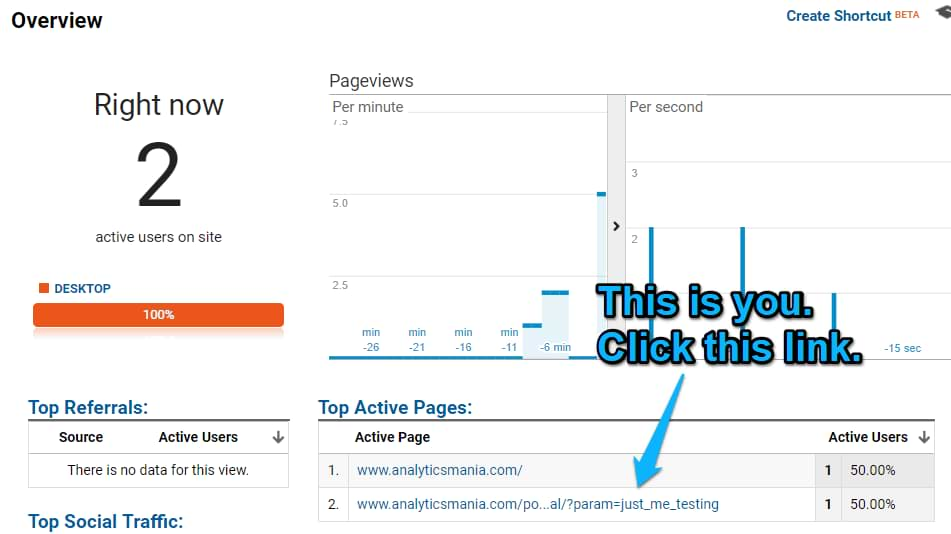
If there are more people that are currently browsing the website from your IP (e.g. co-workers), an easy trick would be to add a bogus query parameter to the URL of your website just to identify your data from other visitors’.
If your web site’s URL is https://www.myawesomewebsite.com, change it to https://www.myawesomewebsite.com?param=just_me_testing and hit enter.
Quickly switch back to the real-time reports. Click the destination address that contains your bogus parameter:
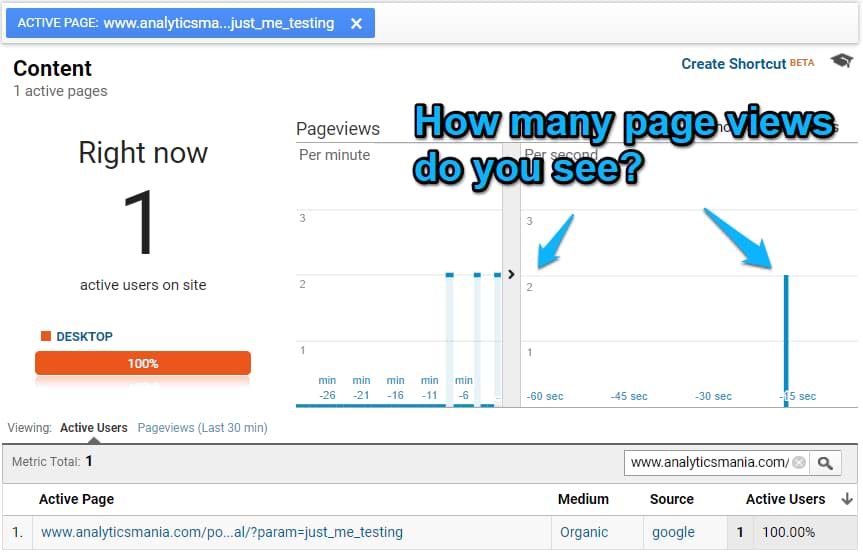
How many pages did you see appearing in the real-time report’s chart at the same time (or over the course of 1-2 seconds)? One or more? If one, the GA setup is correct. If more, this means you have double tagging and you need to get rid of one GA tracking code (or GA tag if we’re talking about Google Tag Manager).
P.S. in order not to pollute your original GA view with the bogus parameters, you should definitely exclude your internal traffic from regular/original GA views.
dataLayer Inspector+
One of the awesome features of this plugin is that it automatically detects duplicate hits that were sent over to Google Analytics. All you need to do is install the Chrome extension, enable it by clicking the icon and then ticking the checkbox next to Data Layer.
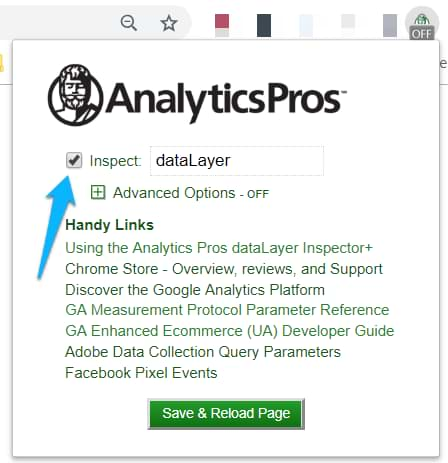
Then go to the browser’s JavaScript console (of Developer tools) and refresh the page. If the warning (similar to the one below) appears in the console, you need to get rid of the duplicate hit (a developer should remove the hardcoded tracking code from website’s source or you should check for duplicate tags in GTM).

#2. Poor migration to GA + Google Tag Manager
This reason is very much related to the previous tip. In fact, double-tagging is often caused by poor migration. There are still many websites that have implemented Google Analytics the old way, by asking a developer to add its tracking code(s) directly to the website’s source. And when their owners finally decide to start using Google Tag Manager, they need to do a proper migration (which in many cases is not easy at all).
I will not dive deeper into the migration process itself. For reference, you can check this awesome guide by Bounteous LINK.
The main thing that you need to know is that a successful migration involves the hardcoded GA codes being completely removed from all pages and they should be replaced by GA Universal Analytics tags in a Google Tag Manager container.
Yet, not everyone succeeds to reach this result and eventually they end up with double tagging and duplicate data: the hardcoded tracking codes are tracking the very same interactions as the ones that are configured in Google Tag Manager (and then sent to that very same Google Analytics property).
So if you have recently migrated to Google Tag Manager Manager and your bounce rate fell hard to the bottom, I have a hunch that double tagging might be the case.
For a solution, please go back to the previous tip (#1) and follow the listed steps.
#3. Some e-commerce hits fire together with a pageview
This applies to Enhanced E-commerce implemented on a website. Since it enables marketers and analysts to see the entire funnel (from viewing a product to purchasing it) it’s logical that some Enhanced E-commerce steps/events are sent to GA when the page is loaded (for example, when a product-list is viewed).
In such cases two hits are sent to Google Analytics, a regular page view and an event that contains E-commerce data (e.g. product impression).
If you’re not familiar with the implementation of Enhanced E-commerce features (via GTM), I suggest reading Simo Ahava’s guide first.
In a nutshell, in order to send EE data to Google Analytics, you need to attach it to a Universal Analytics event or pageview tag in GTM.
Anyway, when a developer pushes the E-commerce data to the Data Layer, you need to enable Enhanced E-commerce features in each tag that you wish to transfer the E-commerce data with to GA.
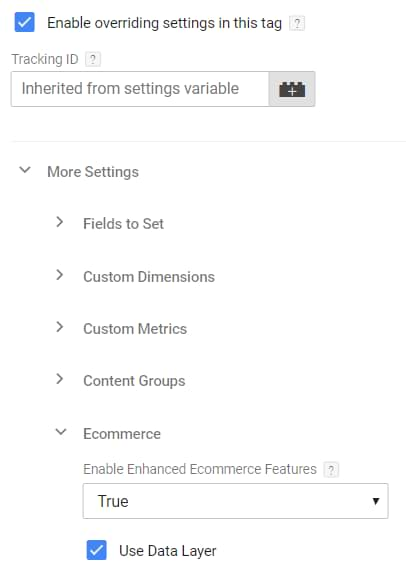
Personally, I create dedicated Google Analytics events for EE funnel steps and each one of them transfers a particular data set that is stored in the ecommerce object in the Data Layer.
The list of possible Enhanced Ecommerce steps is:
- Product impression
- Product click
- Product detail views
- Add to cart/remove from cart
- Checkout steps + checkout options
- Purchase
- Refund
- Promotion impression
- Promotion click
The thing here is that not all of the aforementioned steps should be treated as actual interactions that affect the bounce rate. For example, Product impression is not an interaction. A regular pageview tag already fires on a products list page so why would you need to track the product impression as an additional interaction?
The same principle should apply to product detail views, promotion impression, checkout (if navigating through every step reloads the page). Everything that is related to impressions/views of something should not be considered as actual interactions in GA. At least, that’s the rule I follow.
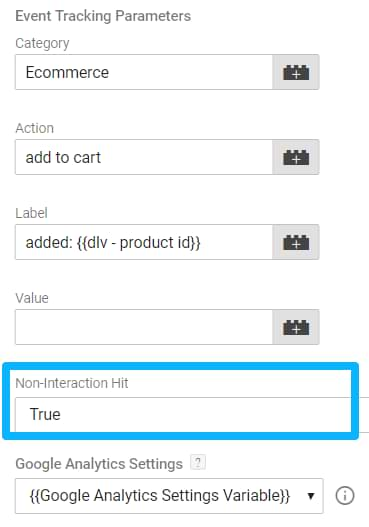
Even though I recommend tracking each EE funnel step with a GA event tag, some of them should not affect the bounce rate. That can be achieved by setting the non-interaction hit option to true.

This means that the event will still be registered in GA (together with an EE data) but the bounce rate will not be affected.
#3.1. Debugging and fixing
So if you have a very low bounce rate in Google Analytics and that implementation includes Enhanced E-commerce features, the first thing I would do is to open all the tags that send the data to GA and individually review their settings.
How can you identify which tags send the EE data?
- If it was properly implemented, tag title might tell this information. For example “GA Event – EE – Add to cart” or something similar.
- Another option is to open tags one by one and check their Enhanced E-commerce settings (that can work if there aren’t hundreds of GA tags).
- Also, you can enable the Preview and Debug mode, navigate through a site and keep looking for some e-commerce-related events on the left side of the P&D console. There are no standard names but if you notice something like addToCart, or ecommerce, or eec.impression, etc., click those events and check which GA tags have fired. Click on them and see their settings. If Enhanced E-commerce features are enabled, this is the tag that should be checked.

These are the options that came to my mind first.
After you collect the list of GA tags that send the EE data, think which ones should not be treated as actual interactions. Once again, based on my personal experience, I recommend tracking all impressions (products impressions, product detail views, promotions) and checkout (this depends on a website) as non-interactions.
And this can be done setting non-interaction hit option to true in those tags that should not be treated as interactions.
Another way, how to debug if you have some event sent right after the pageview tag is to use (once again) the Tag Assistant.
A really useful feature of this extension is Session Recordings.
Recording a flow produces a report of all hits that were sent via marketing tags. This lets you validate that a particular tracking tag on your site works as expected. This includes checking hits that fired within a very short period of time.
After the recording is complete, you can review all events/pageviews/etc. that were passed through and see what particular data was sent, what errors occurred, where they happened, etc.
To start recording a flow, click the Tag Assistant icon and then RECORD button.
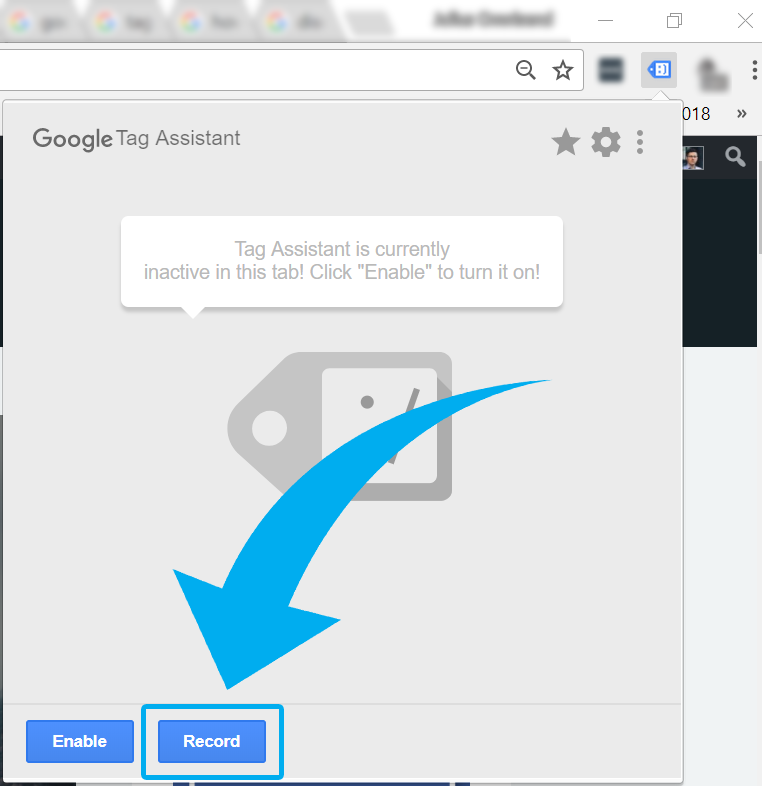
The actual recording will start after you refresh the page. During the entire session, a red dot will be attached to the blue tag icon.
Start navigating the pages that (according to GA reports) have a low bounce rate. After you’re done, stop the recording.
To do that, click the icon, the red STOP RECORDING button and the summary of the session will be displayed. Click Show Full Report.

In a new browser tab, a summary will appear that includes everything the Tag Assistant has captured. In the top of the report, click Google Analytics Report and choose the GA view that you wish to analyze.

Then scroll down to the bottom (till the Flow section). If you see warning icons, they indicate that some issues were identified and you should take a look at them.
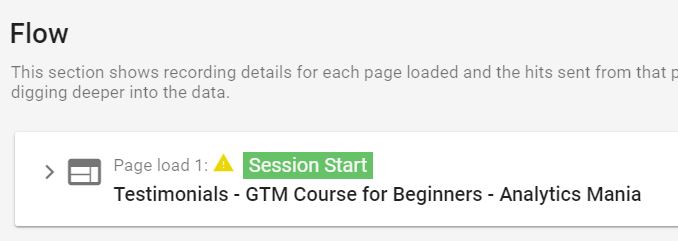
Expand the first page load to see all the hits that were sent over to Google Analytics on that particular page.
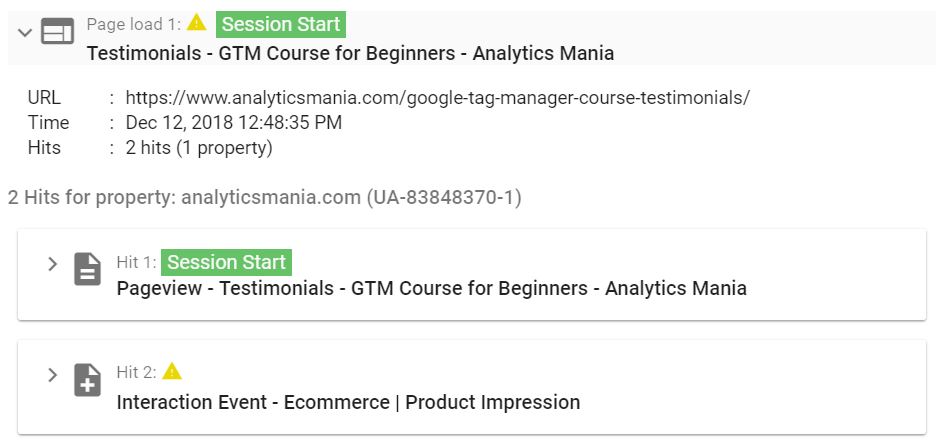
See the exclamation mark icon next to an interaction event? Let’s take a closer look, click that hit.
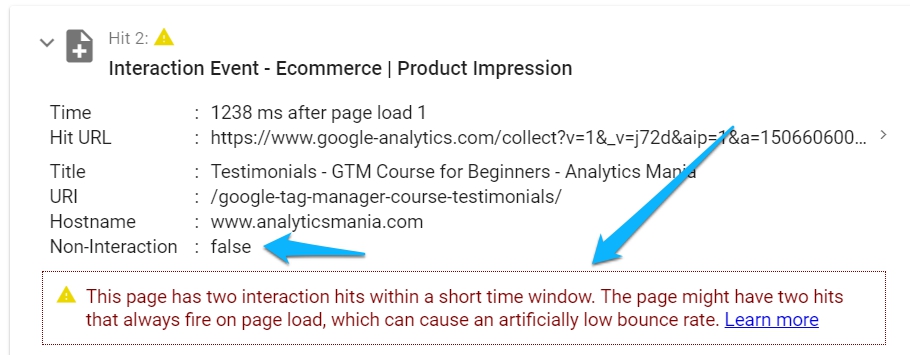
This warning indicates that there was an event (in this case, a Product Detail view) sent right after the initial page view. Since I have already tracked a page view, I should not track a Product Detail View as yet another interaction because it will make my bounce rate artificially low.
The solution here would be to change my Product Detail View’s GA tag in GTM to non-interaction hit: true.
#4. Some other events are sent to GA right after the page view
Even if you don’t have the Enhanced E-commerce implemented on a site, it’s still possible that some other events fire right after the initial page view hit. Apply the previously described method of verifying the implementation with Tag Assistant Recordings and check the generated Google Analytics reports.
First, open GA reports (in Google Analytics interface) and go to Behavior > Site Content > All Pages and see which pages (most visited) have the lowest bounce rate. That’s where I would start looking first.
Enable the Tag Assistant Recordings and navigate through those pages to collect data.
Then repeat the actions that I’ve described in the previous chapter (#3) to identify if there are any issues of multiple hits firing within a very short period of time.
To give you more examples of this issue, check the tips #5, #6 of this blog post.
#5. Single-page application: a virtual pageview is sent right after a regular pageview
Single-page applications/websites do not refresh when a visitor navigates through them. As a result, some additional configuration needs to be done in order to start seeing how visitors are interacting with your content. I’ve published a guide that explains how to utilize History Change trigger in such pages.
If URL fragments (that come after a #) are not present in the URL, you could ask a developer to push some page-related info to the Data Layer whenever a visitor navigates from one section/page to another (Bounteous have explained this topic more thoroughly).
The main idea behind these solutions is to fire a Google Analytics pageview tag every time a state of a page has changed (e.g. a visitor navigated from example.com/#pricing to example.com/#contact-us).
Sounds pretty simple but there is one nuance. Single-page applications (SPA) are not coded in the same way, therefore, it’s natural that their state-changes might behave differently.
In some SPAs, the state change is not pushed to the Data Layer when the visitor lands on a page. See the screenshot below:
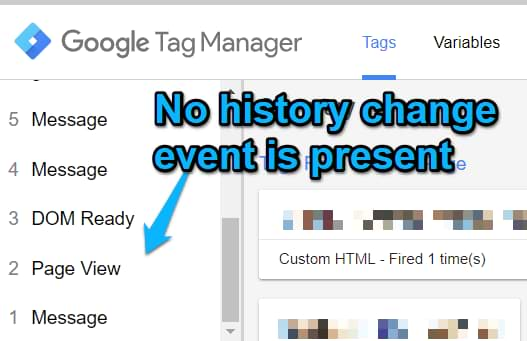
In such cases, a “change” event is registered only when a visitor actually navigates to another section of an SPA. Then the GA Pageview tag should be linked to two triggers:
- The state-change trigger (e.g. History Change trigger)
- and a regular Page view trigger.
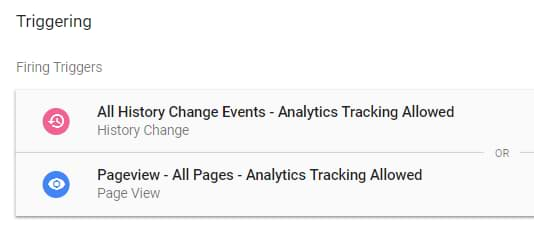
This means that when a page is loaded, the Page view trigger fires the GA Page view tag. And as the visitor continues browsing an SPA, the state-changes (e.g. History Changes) will trigger the subsequent page view hits in GA.
But as I’ve mentioned before, not all the SPAs behave in this manner. Sometimes the state-change event is pushed to the Data Layer with the page load as well, like in the screenshot below. I just landed on a page and I already see the regular Page view event that is followed by the gtm.historyChange event.
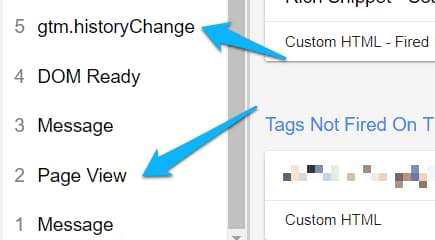
So if you set your GA Page view tag to fire on both All Pages trigger and History Change trigger, you’ll have a 0% bounce rate because GA receives two page views even though there should have been only one.
#5.1. Debugging and fixing
Debugging is pretty simple here. Enable GTM Preview and Debug mode, refresh the page that you’re currently working on (but don’t navigate anywhere) and take a closer look at the summary of P&D console.
How many times was the GA Page view tag fired? If one, you’re good. If two or more, you need to fix this.

Remove Pageview trigger(s) from that GA tag except and keep only the ones that are related to the state change (it might be History Change or a Custom Event trigger).
#6. Scroll tracking
This trigger was the one that caused the discussion in the GTM community about the bounce rate. A member was not sure why should he configure the Scroll Tracking GA events as non-interaction hits because everyone wants to have a low bounce rate.
Let me explain.
Imagine a situation. A visitor lands on your website, scrolls around 50% of the page height and leaves after 5 seconds (without doing anything).
Should such session be counted as a bounce or as a session with interaction (the only interaction that was done here is scrolling)? I think that should be a bounce.
Remember how Avinash Kaushik described a bounce rate: I came, I puked, I left. It has already become a cliché to say this quote every time someone introduces the metric, however, it’s represents the idea really well.
That’s why scrolling should definitely not be treated as an interaction. Unless you modify your tracking:
- Combine the scroll and timer triggers
- Or track when a visitor reached a particular part of your website (say, scrolled till the very end of a blog post)
In other cases (e.g. scrolled 20%), scrolling should definitely not be treated as an interaction.
This especially causes issues of an artificially low bounce rate in Google Analytics when a page height is quite low. In that case, the scroll trigger (without additional modifications) will activate just after the page view because the visitor has indeed passed the mark of 25% of page height.
#6.1. Debugging and fixing
There’s not much of a debugging here. Just go to your GTM container and open the GA Event Tag that tracks scrolling. Change the non-interaction hit to true and save the tag.
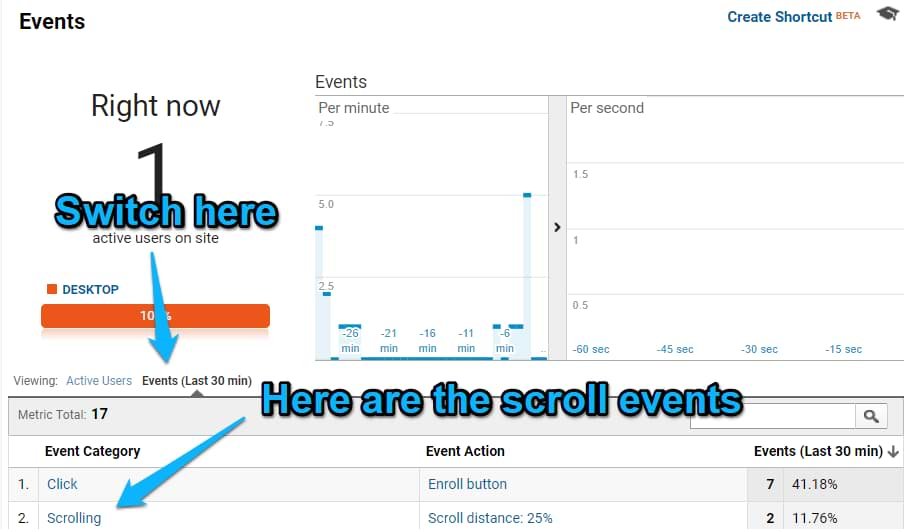
After that change, you need to keep in mind one thing. Non-interaction hits are not displayed in GA real-time reports’ table of active users.
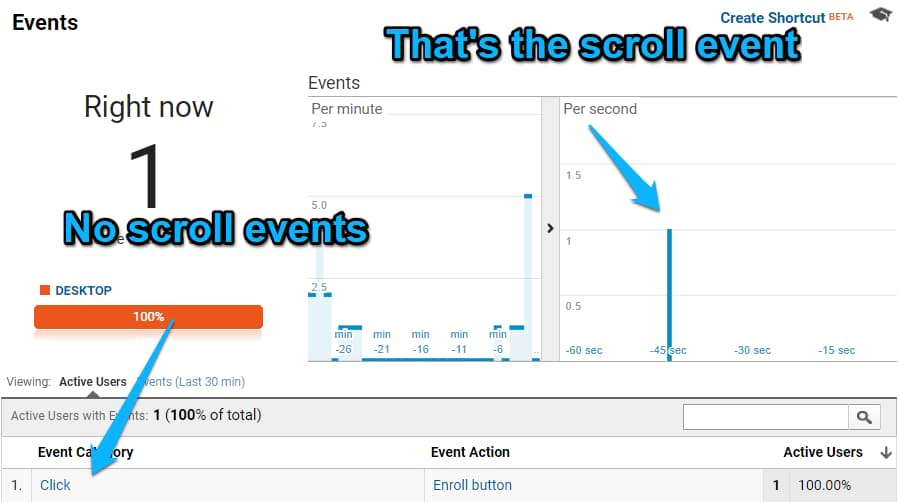
You can only see them in the Events (Last 30 min) section.
(Dis)honorable mention
If all the previous tips/situations are mostly related to the lack of GA knowledge or just honest mistakes, the following reason why your bounce rate is low is caused purely due to the need of having a really bounce rate.
This is a good example of how marketers try to please themselves (or their bosses) by having a really low bounce rate just so they could boast in front of others (without realizing that they basically threw the metric out and made it useless).
I’m talking about the combination of a timer trigger and a Google Analytics event.
Here’s an example: if a visitor spends on a page more than 60 seconds, some people count it as an engagement and the event (non-interaction hit: false) is sent to Google Analytics.
This increases the duration of a session and lowers the bounce rate. Usually down to ~15-30%. Wow, that’s really nice. Not.
Even if the visitor is tab-hoarder who opens loads your website in a new tab and actually never visits it, this will still be tracked as an engagement (even though it actually isn’t).
If you really want to see the more accurate time-related metrics in your GA account, there are other (advanced) solutions.
By having such implementation (of firing an event tag, say, after 1 minute) you’re just covering up real issues that cause the low visitor engagement (that maybe could be identified by having a real non-adjusted metric).
That’s just my two cents. It’s up to you to decide whether to follow this advice or not. But I really hope that you will.
Fixing low bounce rate in Google Analytics: Final Words
So that’s the end of a blog post that started as “that’s should be a quick blog post” and then eventually turned into yet another 4000+ words creature. I should have gotten used to that already but, for some reason, I never do.
Anyway, my point here is that a bounce rate should not be disqualified but it also should not be artificially lowered just to please your (or someone else’s) ego. By doing that (intentionally or accidentally) you’re just turning the bounce rate into a trash and still continuing to use it.
A bounce rate should continue reflecting the situations when visitors leave, don’t do any actual interactions, and leave. Tracking every blink of an eye as an interaction (#sarcasm) is not the way to go.
In this guide, I mentioned several situations where marketers/analysts choose to artificially lower the bounce rate and a bunch of cases where such things happen accidentally/unintentionally. In addition to that, every case included debugging and fixing tips you could apply to your projects.
If I missed anything related to a low bounce rate or if you have something to add/argue about, let me know in the comments below.
Source: analyticsmania