Cookies are a super important part of the web. Imagine the world without them: you wouldn’t be able to use your Facebook or Twitter. They help retain data throughout a user’s visit on a webpage, so naturally, they’re an important component of web analytics, as well.
By default, Google Analytics and other analytics tools use cookies in order to track users’ behavior on your website. Unfortunately, I still see many marketers (working with GTM) suffering over not being able to fire Tags for returning visitors, or after 4 page views, etc.
But this shouldn’t be a problem since you can use Google Tag Manager to set and retrieve data from cookies in a fairly easy way. In this blog post, I’ll show you how to easily utilize cookies with Google Tag Manager and take your web tracking to the next level.
I remember when I was just starting to learn GTM. It was a giant leap for me when I realized I could set and read cookies without a developer’s help. It added much more flexibility and freedom to my tag management.
What if I need to fire a specific Pop-up if a visitor originally landed on my website from Adwords AND has already viewed 5 pages? Not a problem!
Why should you even bother with cookies? Few Examples
By setting and reading cookies with Google Tag Manager you can start creating much-sophisticated triggers, such as:
- A visitor has viewed 5 pages. Let’s show him a popup with a special offer!
- A visitor is actually a user in your SaaS (Software as a service) but is currently browsing without logging in. Nevertheless, he/she still has a cookie with value “registeredUser=true” which can be used as a condition for your trigger.
- A visitor has landed on your website via an affiliate link. With each page view, you can preserve affiliate ID in visitor’s cookie. Here’s the full guide on how to do that.
- Do you have a pricing page with price calculator? Let’s attach the calculator’s results (price) to that particular visitor. This way you’ll see how visitors with different price ranges are behaving on your site.
Pretty neat, huh?
So What’s the Plan?
- First, someone has to set the cookie. That might be either you (with help of Google Tag Manager) or a developer.
- Then, you need to create a 1st party cookie variable in GTM. It will look for a cookie with a particular name and make its value available in the data layer. You will also be able to see it in Google Tag Manager’s Preview and Debug mode.
- Create a trigger where condition involves the aforementioned 1st party cookie variable.
- Fire a tag based on a trigger from bullet point No. 3.
- Profit.
Set cookies with Google Tag Manager
In order to set a cookie, you’ll need to create a custom HTML tag. It contains Javascript code which defines cookie’s name, expiration time, etc.
<script>

 var cookieName = "visitorFromAdwords"; // Name of your cookie
 var cookieValue = "true"; // Value of your cookie
 var expirationTime = 2592000; // One month in seconds
 expirationTime = expirationTime * 1000; // Converts expirationtime to milliseconds
 var date = new Date();
 var dateTimeNow = date.getTime();

 date.setTime(dateTimeNow + expirationTime); // Sets expiration time (Time now + one month)
 var date = date.toUTCString(); // Converts milliseconds to UTC time string
 document.cookie = cookieName+"="+cookieValue+"; SameSite=None; Secure; expires="+date+"; path=/; domain=." + location.hostname.replace(/^www./i, ""); // Sets cookie for all subdomains

</script>
In the script above, there are three variables that you should edit:
- cookieName – you should give it a meaningful title, e.g. visitorFromAdwords, affiliateID, pageviewCount, etc.
- cookieValue – In case of visitorFromAdwords possible values can be true or false. affiliateID cookie’s value can be 2385437, and pageviewCount cookie’s – 5.
- expirationTime defines when the cookie expires. 2592000 is 30 days converted to seconds (30 days * 24 hours * 60 minutes * 60 seconds * 1000 milliseconds). If you want the cookie to expire after the session ends (when the browser window is closed), then remove expires=”+date+”; from the end of the script. Keep in mind, that Google Chrome still runs in the background when you close the browser window, thus the cookie will “live” longer.
Now, you need to decide when you want to set that cookie. Should this “set cookie” script fire when URL contains ?gclid= (meaning that a visitor landed via Adwords campaign)?
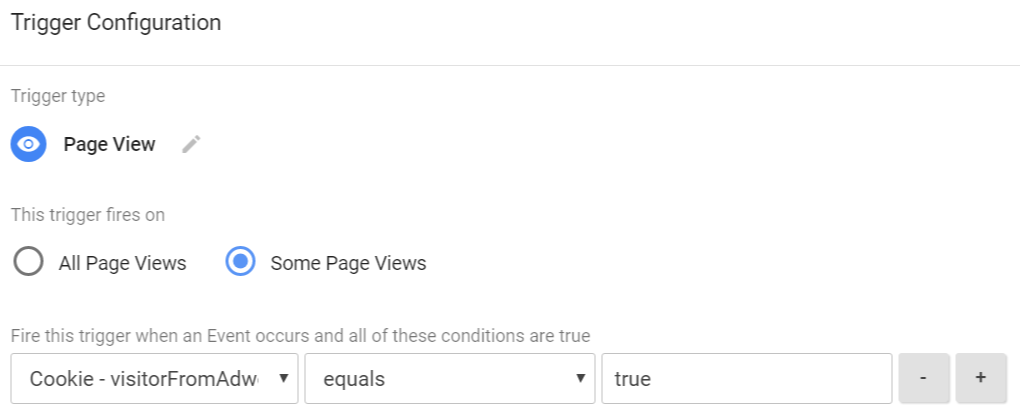
Say, we want to set cookies for those visitors, who have found our website via Google Adwords. In that case, we need to create a trigger with the following settings.

When a person clicks any Google ad, a destination URL contains ?gclid=XXXXXX. That’s the reason behind this trigger’s condition.
Test The Cookie
After you created custom HTML tag with the cookie-setting script and its trigger, next thing you should do is test the implementation with Preview and Debug mode. Make sure that the tag fires ONLY when URL contains ?gclid=. If you’re new to Preview and Debug mode, read this comprehensive guide.
Now, let’s check whether a cookie is set correctly. There are two main ways to check cookies – the browser’s built-in feature (developer tools) or a plugin.
Personally, I am using Chrome plugin called EditThisCookie (also available for Opera users). This really simple and intuitive extension enables me to quickly check which cookies are currently in use and what data do they contain.
If you haven’t already installed, download it here. If you’re using a different browser, you’ll need to find something on your own.
Anyway, let’s get back to EditThisCookie. Once you have installed this extension, a cookie icon will appear next to the Menu icon (in Chrome).
![]()
Go to the website you’re currently working on, click EditThisCookie icon and you’ll see an expanded list of all cookies that are currently in use on that website. Look for a cookie named visitorFromAdwords. This little piece of data will help us do the magic in further chapters of this blog post.

Read The Cookie
Now, we need to “teach” Google Tag Manager read the cookie and make it available as a variable. Go to your GTM account, open list of Variables, and create a new user-defined variable with the following settings:

This variable searches for cookies with title visitorFromAdwords. If it spots one, GTM will read its value and make it available in the Variables tab of Preview and Debug console.

This enables you to use visitorFromAdwords variable in any GTM tag or trigger, like in the example below:
Let’s Count Page Views
First of all, you’ll need to create a custom HTML tag that counts page views. Every time a page refreshes, this script searches for cookie pageviewCount and increments its value by 1.
<script>function setCookie(name, value, expires) {
 var cookie = name + "=" + value + "; path=/; domain=." + location.hostname.replace(/^www./i, "");

 if (typeof expires !== "undefined") {
 var now = new Date();
 now.setTime(now.getTime() + expires * 24 * 60 * 60 * 1000);
 cookie += "; expires=" + now.toUTCString();
 }

 document.cookie = cookie;
}

function getCookie(name) {
 var cookies = document.cookie.split(";"),
 toReturn;

 for (var i = 0; i < cookies.length; i++) {
 var cookie = cookies[i].trim();
 if (cookie.indexOf(name + "=") === 0) {
 toReturn = cookie.substring((name + "=").length, cookie.length);
 }
 }

 return toReturn;
}

(function() {
 var pageviewCount = getCookie("pageviewCount");

 if (typeof pageviewCount === "undefined") {
 pageviewCount = 1;
 } else {
 pageviewCount++;
 }

 setCookie("pageviewCount", pageviewCount, 30);

})();
</script>
The cookie (set by this Javascript) expires after 30 days. You can easily change its duration by editing setCookie(“pageviewCount”, pageviewCount, 30).
Set this custom HTML to fire on all pages. Refresh Preview and Debug mode, open EditThisCookie plugin and check whether the cookie was successfully saved. Now, refresh the page. Cookie’s value should increase to 2.

If you want this cookie to be valid only for that visitor session, here’s a modified script (I’ve removed all parts which are related to the expiration date). Keep in mind, that Chrome handles cookies a bit differently (compared to other browsers). Even if you close the tab or window, Chrome still might keep running in the background, therefore session cookies might be still valid.
<script>function setCookie(name, value) {
 var cookie = name + "=" + value + "; path=/; domain=." + location.hostname.replace(/^www./i, "");

 document.cookie = cookie;
}

function getCookie(name) {
 var cookies = document.cookie.split(";"),
 toReturn;

 for (var i = 0; i < cookies.length; i++) {
 var cookie = cookies[i].trim();
 if (cookie.indexOf(name + "=") === 0) {
 toReturn = cookie.substring((name + "=").length, cookie.length);
 }
 }

 return toReturn;
}

(function() {
 var pageviewCount = getCookie("pageviewCount");

 if (typeof pageviewCount === "undefined") {
 pageviewCount = 1;
 } else {
 pageviewCount++;
 }

 setCookie("pageviewCount", pageviewCount);

})();
</script>
Cookie variable and trigger in Google Tag Manager
Since we have created pageviewCount cookie, now it’s time to “teach” Google Tag Manager read the cookie and make it available as a variable. Go to your GTM account and open a list of Variables. Create a new user-defined variable with the following settings:

Next, go to Triggers and create a new Page view trigger with the following settings:
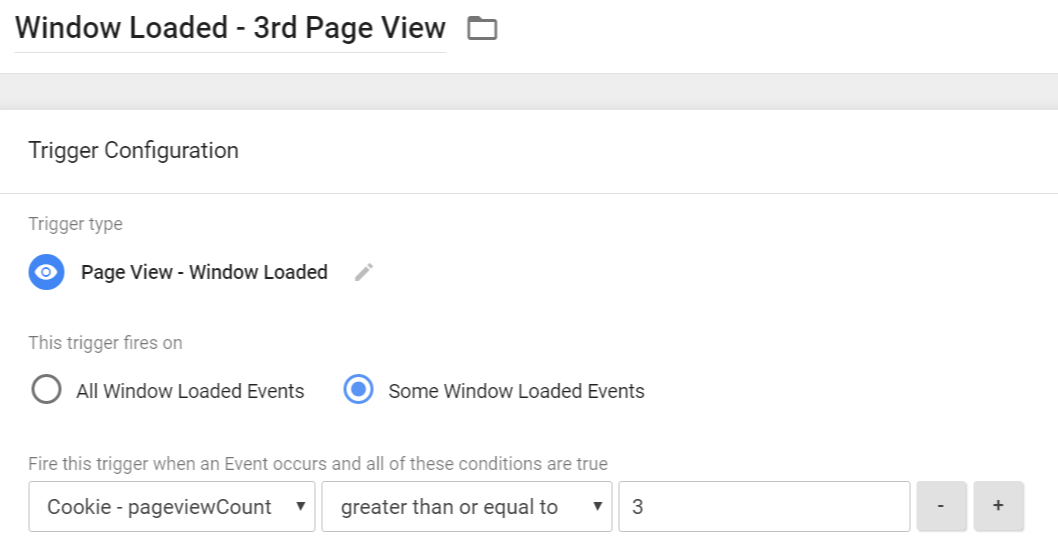
This trigger will fire when the cookie’s value is greater or equal to 3.
That’s it! You can now assign this trigger to any tag you want, whether it is a pop-up or Google Analytics event tag, or whatever. It’s up to your imagination.

Delete a Cookie
If you want to delete a particular 1st-party cookie, you need to set its expiration time to the past date, e.g. 1970 January 1st. Such cookies cannot exist, therefore, they immediately expire.
Here’s a script that you should use:
<script>
(function() {
    var name = 'yourCookieName'; // REPLACE yourCookieName WITH THE NAME OF THE COOKIE YOU WANT TO DELETE
    var path = '';  // If needed, replace this
    var domain = ''; // If needed, replace this
    document.cookie = name + "=" +
		((path) ? "; path=" + path: "") +
		((domain)? "; domain=" + domain: "") +
		";expires=Thu, 01 Jan 1970 00:00:01 GMT";
    })();
</script>
In the 3rd line of the code, change yourCookieName with the name of a cookie you wish to delete. This code should also be implemented via GTM Custom HTML tag and fired whenever you need to delete a cookie (e.g. after a conversion, opt-out or something else).
Also, if your cookie has a specified domain and path, insert the values in the ‘path’ and ‘domain’ variables (in the JavaScript code). But you can start by keeping those field (in 4th and 5th lines) empty and see if it works.
Few More Ideas
If you still don’t know how to leverage cookies in your marketing stack, here’s food for thought. I hope these examples will help you break the ice:
- If you run an affiliate program, you already know that visitors come to your site via affiliate links (which contain unique affiliate ID). You can fetch that data from URL, set it as a cookie and send to Google Analytics as Custom Dimensions. This way you’ll see how well/terrible affiliate traffic is converting. Also, you can identify which affiliate partner is driving the most engaged traffic.
- If a person made a purchase on your site, save this fact as a cookie. Then, create a pageview trigger that blocks pop-ups (irrelevant to recent buyers).
- If you run a SaaS business, ask developers to set various data about the user to cookies. Even if the user is logged out, you can still identify him/her visiting your website/blog/etc. and send that data to Google Analytics as custom dimensions. But be aware of PII limitations.
Not all 1st party cookies can be read with Google Tag Manager
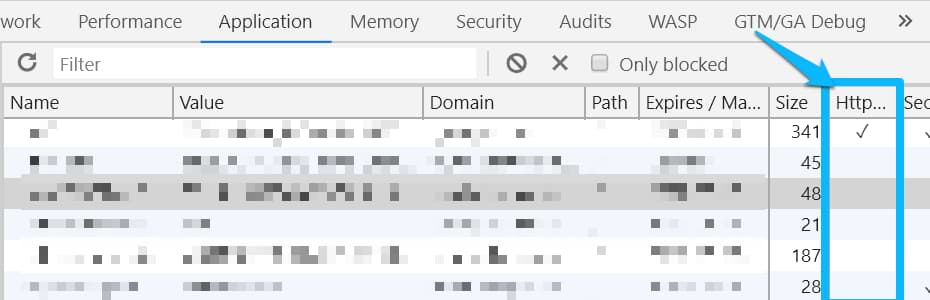
In fact, this applies not only to GTM but to client-side JavaScript in general. If you’re already familiar with cookies, you know that all the cookies (set on that page) can be seen by going to your browser’s developer tools. I’m using Chrome, therefore, the full path to that part is Chrome’s Menu > More Tools > Developer Tools > Application > Cookies.
Then choose your domain. You should see something like this:

Those are the 1st party cookies you could potentially use in Google Tag Manager. Various scripts and other functionality on your site set those cookies to your visitors’ browsers. However, not all of them can be accessed by JavaScript in your browser (including GTM).
If a cookie has a checkbox in the HttpOnly column, GTM will not be able to access its value. This means that a 1st party cookie variable will return undefined.
Working with cookies and Google Tag Manager: Final Words
So there you have it. Turns out it’s pretty easy to manage cookies with Google Tag Manager. First, you need to fire a custom HTML tag that sets the cookie with a particular value. Then, you need to create a 1st party cookie variable within GTM.
This variable’s value can be transferred to other tools (such as Google Analytics) or used as a firing condition within a trigger.
If you’re looking for ways how to fire a particular tag after 3 page views, or for those visitors, who have visited a particular page, then cookies should be your weapon of choice. Another solution is browser storage (localStorage and sessionStorage), but that’s a topic for another time.
Do you know more tricks on how to use cookies with Google Tag Manager? Let me know in the comments.
Source: analyticsmania