One of the reasons why I just love working with Google Tag Manager is the possibility to reuse data and send them to multiple marketing/analytics tools at once. In 2019, Simo Ahava posted an article that explains how to adapt Google Analytics Enhanced Ecommerce data and send it to Facebook Pixel.
Later, I used his solution as a foundation for my guide, where I do the same thing with Google Analytics Standard Ecommerce. Today, I’ll use a similar principle to use Enhanced Ecommerce data in Pinterest Tag with Google Tag Manager.
Table of contents
+ Show table of contents +
- A guide on how to implement Pinterest Pixel with GTM
- #1. Requirements
- #2. The process
- #3. Check the data in the Data Layer
- #4. Custom JavaScript variable that transforms EE product data
- #5. Data Layer that returns an ecommerce object
- #6. Page visit (with product details)
- #7. Add To Cart
- #8. Checkout
- Final words about how to use Enhanced Ecommerce data in the Pinterest pixel
A guide on how to implement Pinterest Tag with GTM
If you are not familiar with how to implement Pinterest Tag via Google Tag Manager in general, you should first read this guide. After that, come back here.
#1. Requirements
For this solution to work, you must meet three requirements.
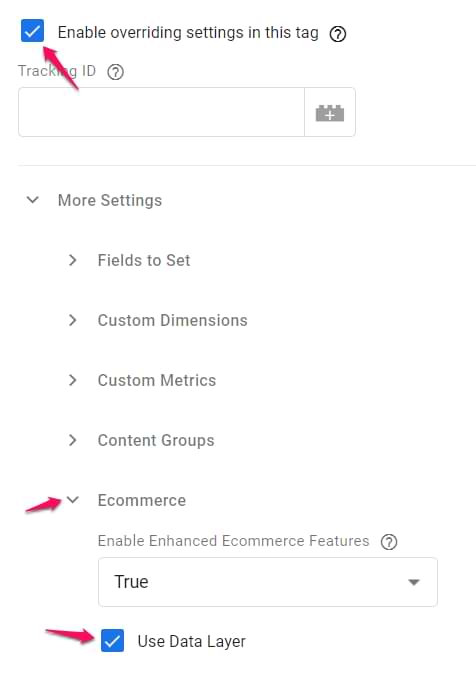
#1. Properly formatted Enhanced Ecommerce data in the Data Layer. For this solution to work, you Enhanced Ecommerce setup must be using a valid and properly formatted e-commerce object in the Data Layer.
If your Google Analytics tags (that are sending Enhanced Ecommerce data to GA) is using the Use Data Layer option, then you should be fine (probably).
If on the other hand, your GTM Enhanced Ecommerce setup is heavily relying on the Custom JS variable, you might need to manually update my codes as well and that requires JavaScript knowledge. Unfortunately, I cannot give you specific advice here because every situation is different.
#2. At least Product ID, Product Name, Product Price, and Product Quantity should be available in the Data Layer (ecommerce object). Pinterest tag supports more product data points (such as product variant or product category) but if you don’t have all of that in the data layer, you should have at least:
- Product ID
- Product Name
- Product Price
- Product quantity
Here’s an example of the dataLayer.push that contains enough product data:
window.dataLayer = window.dataLayer || [];
window.dataLayer.push({
  event: 'eec.purchase',
  ecommerce: {
    currencyCode: 'EUR',
    purchase: {
      actionField: {
        id: 'abc123',
        revenue: '12.00',
        tax: '2.00',
        shipping: '2.00'
      },
      products: [{
        id: 'prod1',
        name: 'First product',
        quantity: 2,
        price: '3.50'
      },{
        id: 'prod2',
        name: '2nd product',
        price: '3.00',
        quantity: 1
      }]
    }
  }
});
#3. This solution uses product detail, add to cart, and purchase data (of Enhanced Ecommerce).
This blog post will rely on three ecommerce actions:
- When a visitor views a product page (in Enhanced Ecommerce, this is called “Product Detail”)
- When a visitor adds product(s) to a cart (In Enhanced Ecommerce, it’s “Add To Cart”)
- When a visitor makes a purchase (In Enhanced Ecommerce, it’s “Purchase”)
#2. The process
And now, let’s dive into the actual process of how are we going to implement this:
- First, we’ll check whether we have all the Enhanced Ecommerce data correctly configured in the Data Layer
- We will configure one JavaScript variable that’s main purpose will be to adapt GA Enhanced Ecommerce data to Pinterest tag.
- Then we’ll create a Data Layer Variable that accesses Enhanced Ecommerce’s ecommerce object.
- Then we will start with Page visits (when we’ll also pass product info), then Add To Cart, and finally, Purchase (in Pinterest tag, purchases are called checkouts).
- Then we’ll need to create several more variables that will include particular data (such or product count, etc.).
- After everything is done, obviously, we’ll need to test.
#3. Check the data in the Data Layer
Page visit event (together with product data) should be sent when GA Enhanced Ecommerce Product Detail data is available in the Data Layer. Remember: the data must be formatted strictly as it is displayed in the official GA documentation or Simo Ahava’s blog post.
Here’s an example of the product detail data:
window.dataLayer = window.dataLayer || [];
window.dataLayer.push({
  event: 'eec.detail',
  ecommerce: {
    detail: {
      products: [{
        id: 'prod1',
        name: 'First product',
        quantity: 2,
        price: '3.50'
      }]
    }
  }
});
There can be more data points (e.g. product variant, product category, etc.) but most importantly, the ecommerce object must contain a detail object (just like it is displayed above) and then there must be a products array. Also, all parameters must strictly follow Google’s naming convention for Enhanced Ecommerce.
All parameters must be named exactly as in the example above (or GA’s documentation or Simo’s blog post).
Speaking of Add To Cart, here is an example of correct data in the data layer:
window.dataLayer = window.dataLayer || [];
window.dataLayer.push({
  event: 'eec.add',
  ecommerce: {
    add: {        // instead of -detail-, here we see -add-
      products: [{
        id: 'prod1',
        name: 'First product',
        quantity: 2,
        price: '3.50'
      }]
    }
  }
});
This one looks quite similar to the previous code. However, it’s very important that instead of “detail” (below the “ecommerce”), there must be “add”. This indicates that the following code is related to the Add To Cart action.
And finally, the purchase code. Here’s an example of what it should look like in the Data Layer:
window.dataLayer = window.dataLayer || [];
window.dataLayer.push({
  event: 'eec.purchase',
  ecommerce: {
    currencyCode: 'EUR',
    purchase: {
      actionField: {
        id: 'abc123',
        revenue: '12.00',
        tax: '2.00',
        shipping: '2.00'
      },
      products: [{
        id: 'prod1',
        name: 'First product',
        quantity: 2,
        price: '3.50'
      },{
        id: 'prod2',
        name: '2nd product',
        price: '3.00',
        quantity: 1
      }]
    }
  }
});
This code contains the purchase object and inside of it, you’ll find the products that were purchased and the actionField object that contains the transaction info (order ID, etc.)
Have no clue about how to implement the Enhanced Ecommerce on your website in the first place? Take a look at my Intermediate/Advanced GTM course were I have a very in-depth module dedicated just to this topic. Very in-depth.
Ok, now that we have checked that data in the Data Layer is properly formatted (if you’re not sure, you MUST check it against the official Google documentation).
#4. Custom JavaScript variable that transforms EE product data
First, we need to create a variable that will take an Enhanced Ecommerce products array and will turn it into Pinterest-friendly format. I saw this idea for the first time in Simo Ahava’s blog post.
In Google Tag Manager go to Variables > User-defined Variables > New > Custom JavaScript and paste the following code:
function() {
    return function(products) {
        if (!Array.isArray(products)) {
            return products;
        }
        var prodsForPinterest = products.map(function(prod) {
            var prodObj = new Object();
            if (prod.name) {prodObj.product_name = prod.name};
            if (prod.id) {prodObj.product_id = prod.id.toString()};
            if (prod.price) {prodObj.product_price = parseFloat(prod.price)};
	    if (prod.quantity) {prodObj.product_quantity = parseInt(prod.quantity)};
            if (prod.category) {prodObj.product_category = prod.category};
            if (prod.variant) {prodObj.product_variant = prod.variant};
            if (prod.brand) {prodObj.product_brand = prod.brand};
            return prodObj;
        })
        return prodsForPinterest;
    }
}
Name this variable cjs – ee product data to pinterest (or something shorter).
This variable returns a function that will accept an EE products array and will then return the Pinterest-friendly array. As you can see in the code, the list of product supported parameters goes as follows:
- product_name will use the name parameter in the Enhanced Ecommerce dataLayer
- product_id will use the id parameter in the EE dataLayer
- roduct_price will use the price parameter in the EE dataLayer
- product_quantity will use the quantity parameter in the EE dataLayer
- product_category will use the category parameter in the EE dataLayer
- product_variant will use the variant parameter in the EE dataLayer
- product_brand will use the brand parameter in the EE dataLayer
In a nutshell, if this is what a products array looks in the Data Layer:
window.dataLayer = window.dataLayer || [];
window.dataLayer.push({
  event: 'eec.detail',
  ecommerce: {
    detail: {
      products: [{
        id: 'prod1',
        name: 'First product',
        quantity: 2,
        price: '3.50',
        category : 'shoes',
        variant : 'red',
        brand : 'nike'
      }]
    }
  }
});
Then the output that will be returned by that function will look like this:
[{
        product_name : 'First product',
        product_id : 'prod1',
        product_price :  '3.50',
        product_quantity : 2,
        product_category : 'shoes',
        product_variant : 'red',
        product_brand : 'nike'
}]
If some of the product parameters (e.g. variant) are not available in the data layer, then it will not be included in the Pinterest-friendly output as well.
#5. Data Layer that returns an ecommerce object
In this setup, we will be relying on the ecommerce object that is necessary for the Enhanced Ecommerce to work. To access that information, we need a Data Layer Variable that will return the latest push to the ecommerce object.
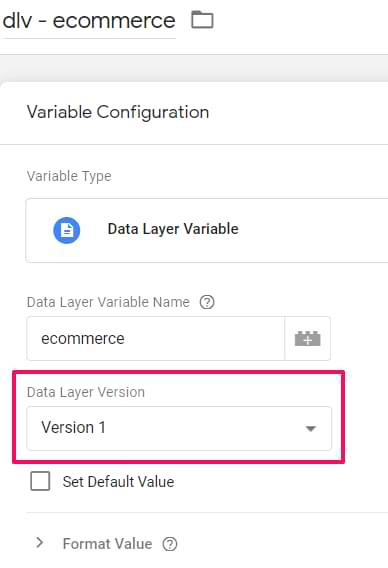
That’s why we need to go to GTM > Variables > User-defined Variables > New > Data Layer Variable with the following settings:
- Data Layer Variable Name – ecommerce
- Data Layer Version – Version 1 (not 2!!!)
- Name of the Variable – dlv – ecommerce (exactly like this)
#6. Page visit (with product details)
Remember that previously created Custom JavaScript variable? And the previously created Data Layer Variable (for ecommerce object)? Now, we are going to create a new Custom JS variable that will use both of those variables.
#6.1. Custom JS variable that returns the final product output
In GTM, go to Variables > User-defined variables > New > Custom JavaScript. In that variable, paste this:
function() {
    var products = ;
    return ;
}
Insert the dlv – ecommerce Data Layer Variable right after the “products =”.
function() {
    var products = {{dlv - ecommerce}};
    return ;
}
Now we need to access the products array in that object, therefore, we need to add “.detail.products” after the Data Layer Variable.
function() {
    var products = {{dlv - ecommerce}}.detail.products;
    return ;
}
Now, insert the cjs – ee product data to pinterest Custom JavaScript variable after “return”. The one that transforms data from EE format to a Pinterest-friendly structure. Remember, that a variable must be surrounded by {{ }}.
function() {
    var products = {{dlv - ecommerce}}.detail.products;
    return {{cjs - ee product data to pinterest}};
}
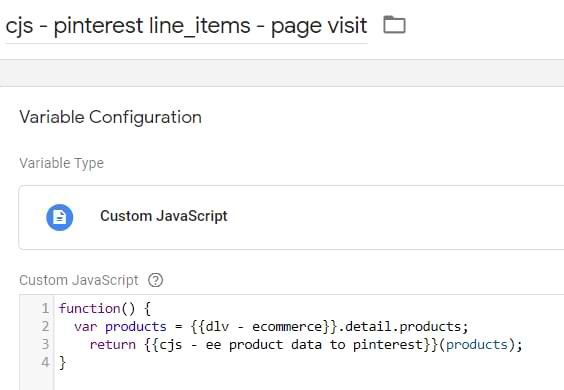
Then, after the variable (before the semicolon), enter (products):
function() {
    var products = {{dlv - ecommerce}}.detail.products;
    return {{cjs - ee product data to pinterest}}(products);
}
You can name this Custom JavaScript variable anything you want. I would personally prefer cjs – pinterest line_items – page visit.
Here’s a quick explanation of what this variable does:
- It takes the function stored within cjs – ee product data to pinterest
- Calls that function
- Passes products array stored in the dlv – ecommerce.detail.products variable to that function
- And then returns the result of that function
And the result is a Pinterest-pixel-friendly array of products.
#6.2. Test the variable
Let’s save this variable and test it. Enable or refresh the GTM preview mode. Go to the product page where the product detail dataLayer.push occurs.
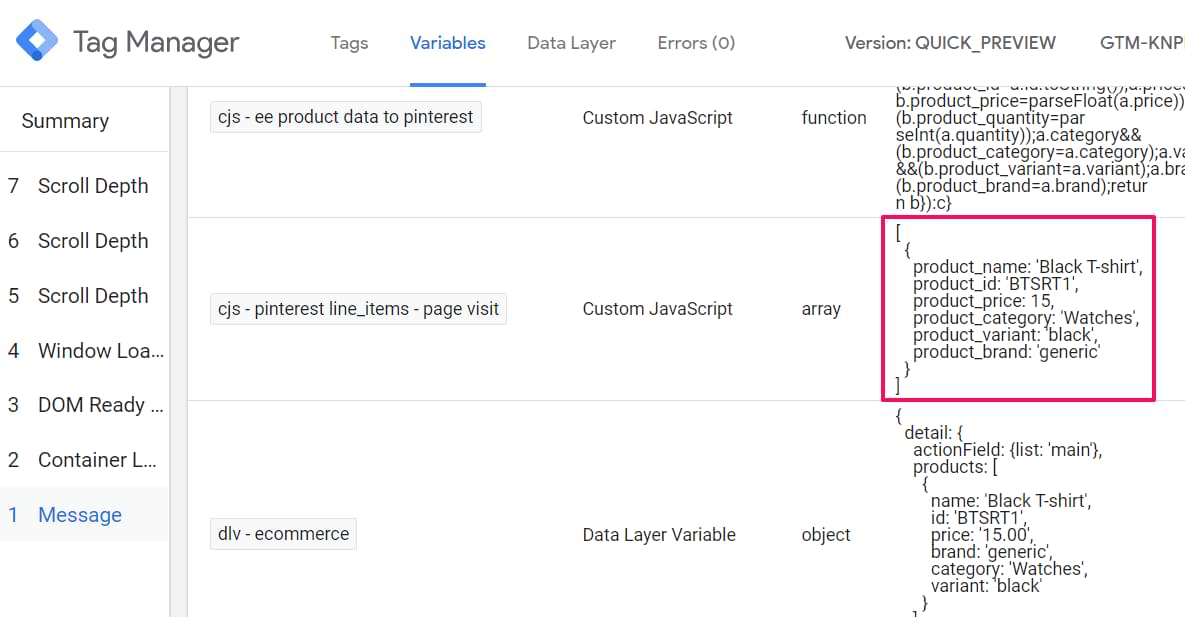
When you see it (for example, maybe that dataLayer.push contains an event key “eec.detail”. Or maybe it is displayed as a “Message”), click it and go to the Variables tab of the preview mode. Check the Custom JS variable that we created the last (cjs – pinterest line_items – page visit).
That variable must return the newly formatted array (you can know that it’s an array if it’s surrounded by square brackets []).
If it is undefined, this means that most likely, you made a mistake in the Custom JS variable cjs – pinterest line_items – page visit.
If you don’t know how to properly debug this, the easiest way is to name ALL variables EXACTLY as I instructed in this blog post. Case-sensitive. Every space matters.
#6.3. Insert the Custom JS variable into the Page visit tag
Once you make sure that the variable works fine, open the Pinterest Page Visit tag (in GTM interface) that you should have created before even starting to read this blog post.
Have no idea what I am talking about? Read this guide on how to implement Pinterest Tag with Google Tag Manager.
When you open the Page Visit tag, click the Custom Parameters checkbox, enter:
- line_items in the name field
- insert the cjs – pinterest line_items – page visit variable in the value field

#6.4. Test the page visit tag
The final step is to test the Page visit tag and see if the product info is received by Pinterest. Save the tag, refresh the GTM preview mode and go to a product page.
When you do that and when the Pinterest Page Visit tag fires, open the Pinterest Tag Helper extension and check whether the Page visit was sent correctly. Then click it and check whether the product data was properly sent too.
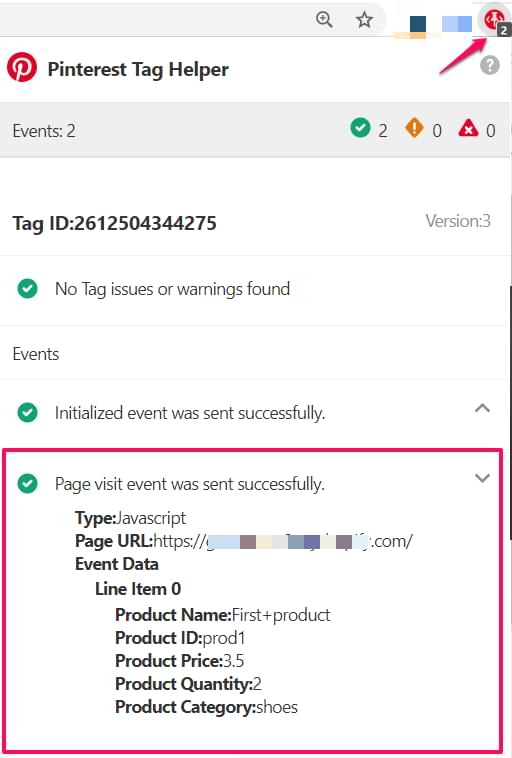
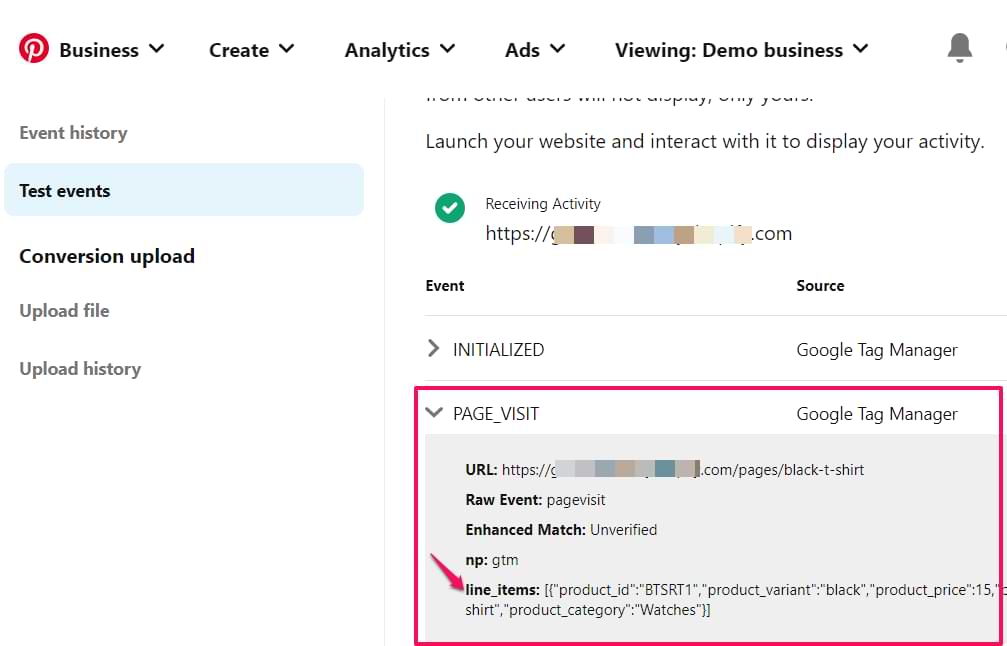
Then go to ads.pinterest.com > Conversions > Test events, enter the URL of the product page, and click Launch. After that, check the Test Events page and expand the PAGE_VISIT to verify that product data is actually received.
#7. Add To Cart
The next step is to track when a visitor adds products to a cart. This time, I’ll try to be shorter with my explanations.
#7.1. Custom JS variable that returns the final product output
Let’s create another Custom JS variable that will use the cjs – ee product data to pinterest and dlv – ecommerce.
Here’s the final code of the variable:
function() {
    var products = {{dlv - ecommerce}}.add.products;
    return {{cjs - ee product data to pinterest}}(products);
}
IMPORTANT: if you used different names for {{variables}} in your container, you must update the code above as well. Also, take note that this time in the code, I am using {{dlv – ecommerce}}.add.products, not {{dlv – ecommerce}}.detail.products
I named this variable cjs – pinterest line_items – add to cart.
Save the variable.
#7.2. A tag and a trigger
In this case, I presume that you do not have the Add To Cart Pinterest Tag yet. I also presume that when Enhanced Ecommerce add to cart dataLayer.push occurs, it contains an “event” key with the value “eec.addToCart”. Something like this:
window.dataLayer = window.dataLayer || [];
window.dataLayer.push({
  event: 'eec.add', // I presume that your dataLayer.push contains this parameter
  ecommerce: {
    add: {
      products: [{
        id: 'prod1',
        name: 'First product',
        quantity: 2,
        price: '3.50'
      }]
    }
  }
});
In GTM interface, go to Tags > New > Pinterest. Enter your Pinterest Tag ID and choose Add To Cart in the Event to Fire field.
Then you will see a bunch of fields that you should enter. We’ll skip some of them (because usually, the Order ID is still not available during the add to cart).
Speaking of the Order quantity, we’ll create a Custom JavaScript variable with the following code:
function() {
  var totalQuantity = 0;
  var ecom = {{dlv - ecommerce}};
  if (ecom.add && ecom.add.products) {
    ecom.add.products.forEach(function(product) {
      totalQuantity += product.quantity;
    });
  };
return totalQuantity;
}
Name this variable cjs – order quantity – add to cart and save it. If you noticed, here I am using the same dlv – ecommerce variable that was already mentioned several times in this blog post.
Insert this variable in the Order Quantity field of the Add To Cart tag. This variable returns the number of products that were added to a cart.
Speaking of products, click the Custom Parameters checkbox and enter:
- line_items in the name field
- insert the cjs – pinterest line_items – add to cart variable in the value field (that’s the Custom JS variable that we created specifically for the Add To Cart products.
The final configuration of the tag (excluding the trigger) might look something like this:
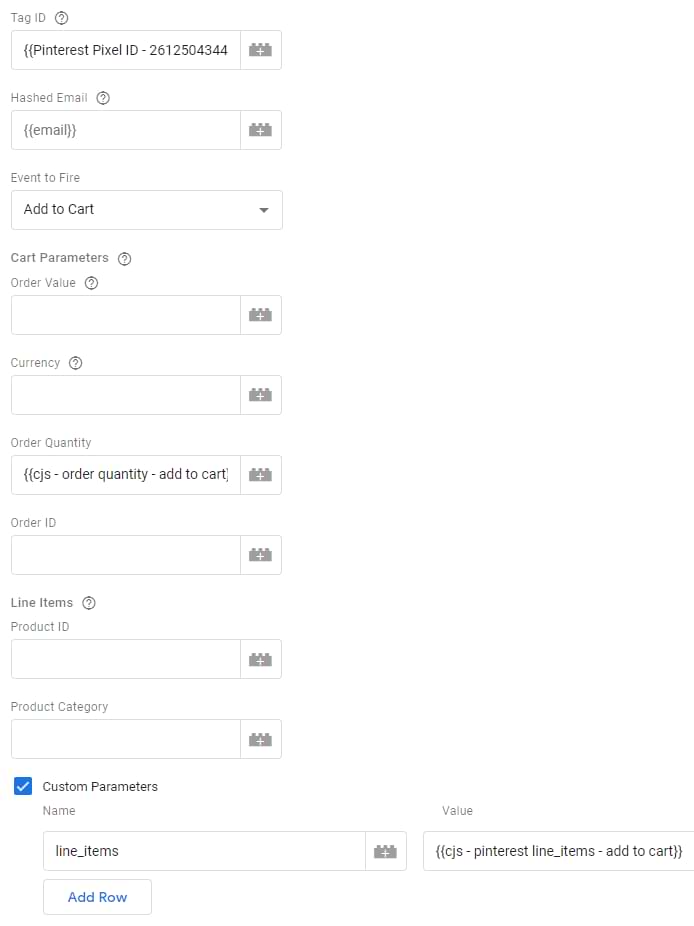
Your variable names might be different. Also, you don’t have to enter things like order quantity.
As for trigger, I presume that the Enhanced Ecommerce Add To Cart dataLayer.push contains the “event” key with value “eec.addToCart”, therefore, I will create a following Custom Event Trigger.
In GTM, go to Triggers > New > Custom Event and enter the eec.addToCart.
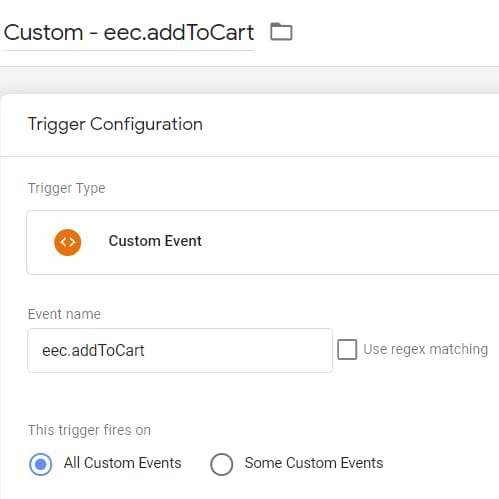
Save the trigger and assign it to the Pinterest Add To Cart Tag.
#7.3. Test the Add To Cart tag
The final step is to test the Add To Cart tag and see if the product (and other) info is received by Pinterest. Save the tag, refresh the GTM preview mode and add a product to a cart.
When you do that and when the Pinterest Add To Cart tag fires, open the Pinterest Tag Helper extension and check whether the “Add To Cart” was sent correctly. Then click it and check whether the product data was properly sent too.
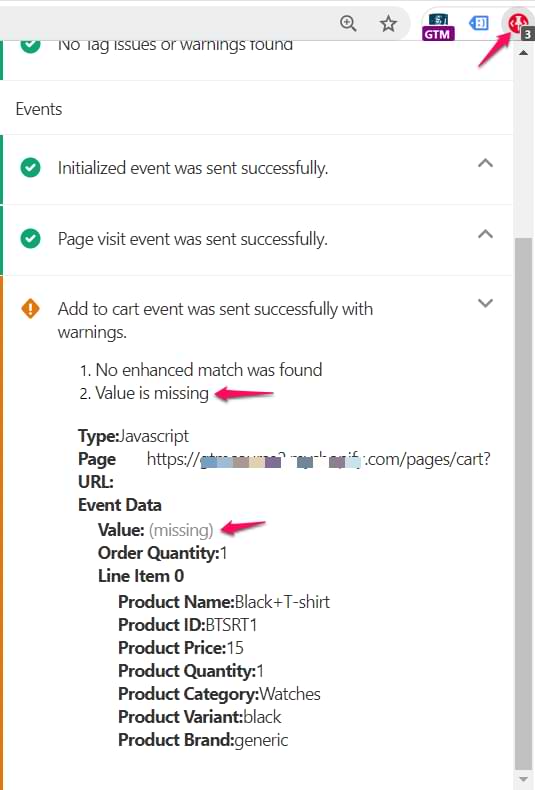
If you haven’t passed the value parameter (which, I guess, is the total value of products added to a cart), you will get a warning (just like I did in the screenshot above). However, it looks like this parameter is optional because the rest of the data was still properly received by Pinterest. In fact, even the Pinterest Tag Helper says that Add to cart event was sent successfully with warnings.
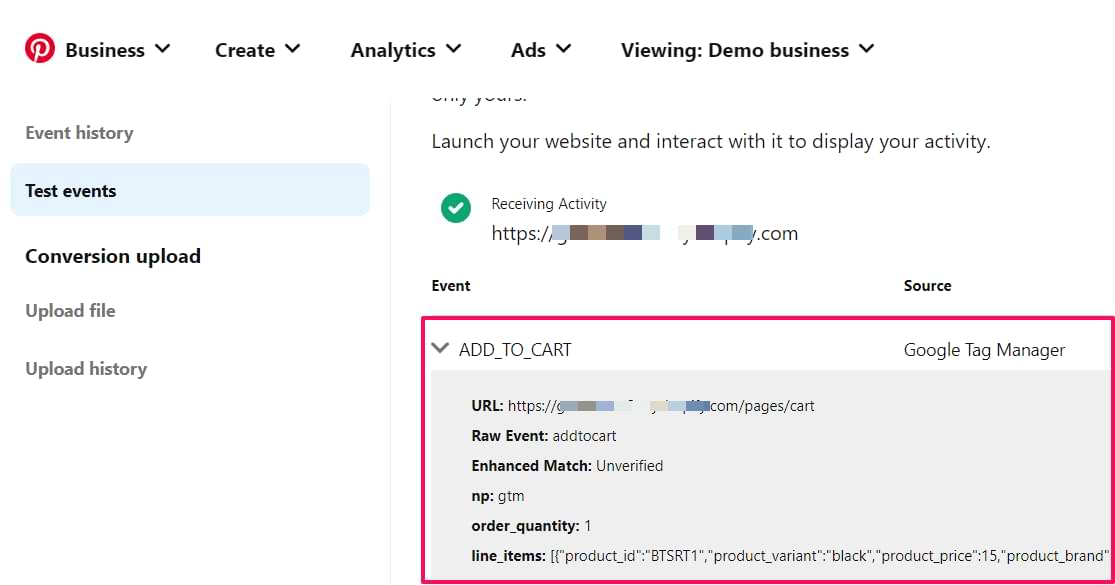
Go to ads.pinterest.com > Conversions > Test events, enter the URL of the product page, and click Launch. After that, check the Test Events page and expand the ADD_TO_CART to verify that product data is actually received.
#8. Checkout (a.k.a. purchase)
The final major part of this blog post. It’s time to track purchases and in Pinterest Tag’s context, Checkout = Purchase. This might be tricky if you are very used to GA’s EE naming convention (where “Checkout” is the steps between the “Add to cart” and “purchase”).
#8.1. Custom JS variable that returns the final product output
Here’s the final code of the variable:
function() {
    var products = {{dlv - ecommerce}}.purchase.products;
    return {{cjs - ee product data to pinterest}}(products);
}
IMPORTANT: if you used different names for {{variables}} in your container, you must update the code above as well.
I named this variable cjs – pinterest line_items – checkout.
Save the variable.
#8.2. A tag and a trigger
In this case, I presume that you do not have the Checkout Pinterest Tag yet. I also presume that when Enhanced Ecommerce purchase dataLayer.push occurs, it contains an “event” key with the value “eec.purchase”. Something like this:
window.dataLayer = window.dataLayer || [];
window.dataLayer.push({
  event: 'eec.purchase',
  ecommerce: {
    currencyCode: 'EUR',
    purchase: {
      actionField: {
        id: 'abc123',
        revenue: '12.00',
        tax: '2.00',
        shipping: '2.00'
      },
      products: [{
        id: 'prod1',
        name: 'First product',
        quantity: 2,
        price: '3.50'
      },{
        id: 'prod2',
        name: '2nd product',
        price: '3.00'
      }]
    }
  }
});
In GTM interface, go to Tags > New > Pinterest. Enter your Pinterest Tag ID and choose Checkout in the Event to Fire field.
Then you will see a bunch of fields that you should enter. You are free to skip some of them. But in this blog post, I’ll fill them all in.
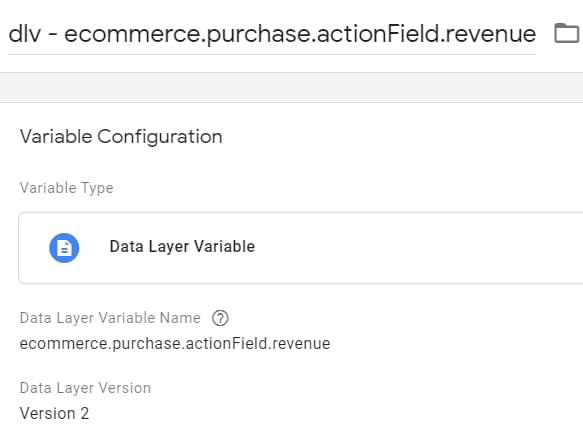
In the Order Value field, I’ll insert the Data Layer Variable with the following configuration (ecommerce.purchase.actionField.revenue):
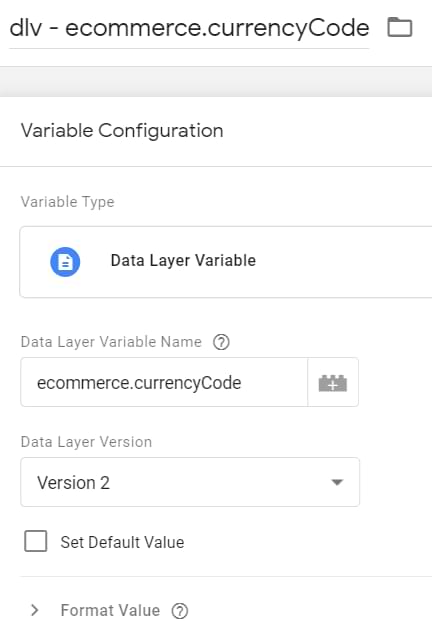
In the currency field, I’ll enter the following Data Layer Variable (since I have this parameter in the Data Layer):
To track order quantity, create a Custom JavaScript variable with the following code:
function() {
  var totalQuantity = 0;
  var ecom = {{dlv - ecommerce}};
  if (ecom.purchase && ecom.purchase.products) {
    ecom.purchase.products.forEach(function(product) {
      totalQuantity += product.quantity;
    });
  };
return totalQuantity;
}
Name this variable cjs – order quantity – purchase and save it. Also, keep in mind that if you named the dlv – ecommerce variable somehow differently, you must also update the code above to match that name.
Insert this variable in the Order Quantity field of the Checkout tag. This variable returns the number of products that were purchased.
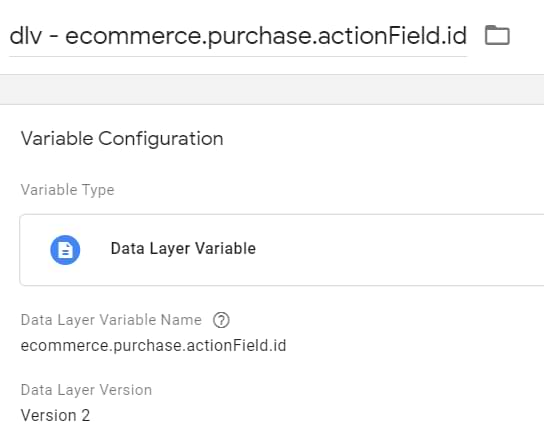
In the Order ID field, enter the following Data Layer Variable (ecommerce.purchase.actionField.id):
Speaking of products, click the Custom Parameters checkbox and enter:
- line_items in the name field
- insert the cjs – pinterest line_items – checkout variable in the value field (that’s the Custom JS variable that we created specifically for the purchased products.
The final configuration of the tag (excluding the trigger) might look something like this:
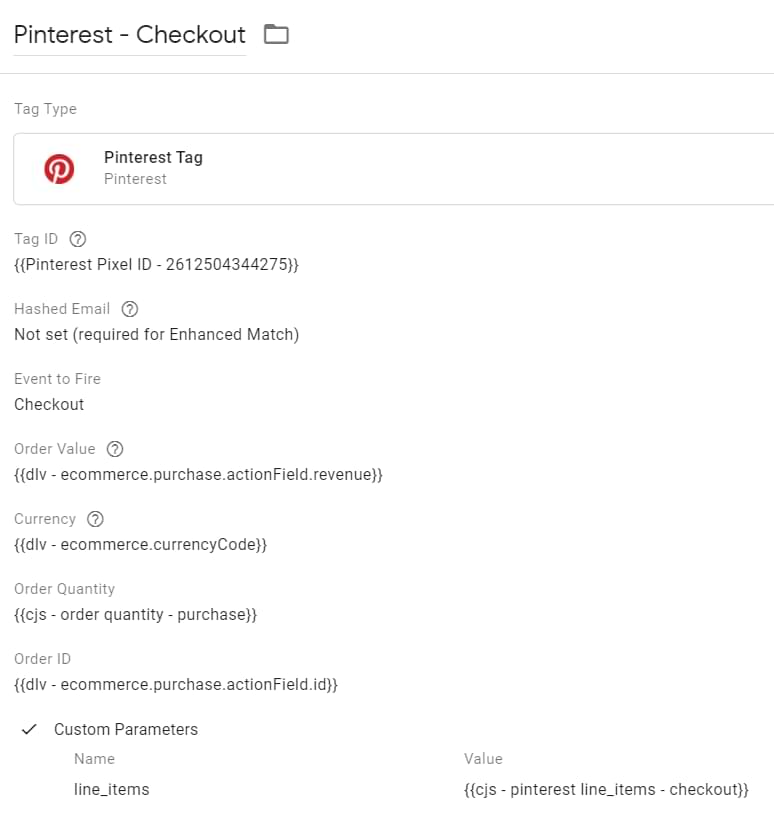
Your variable names might be different.
As for trigger, I presume that the Enhanced Ecommerce Purchase dataLayer.push contains the “event” key with value “eec.purchase”, therefore, I will create a following Custom Event Trigger.
In GTM, go to Triggers > New > Custom Event and enter the eec.purchase.
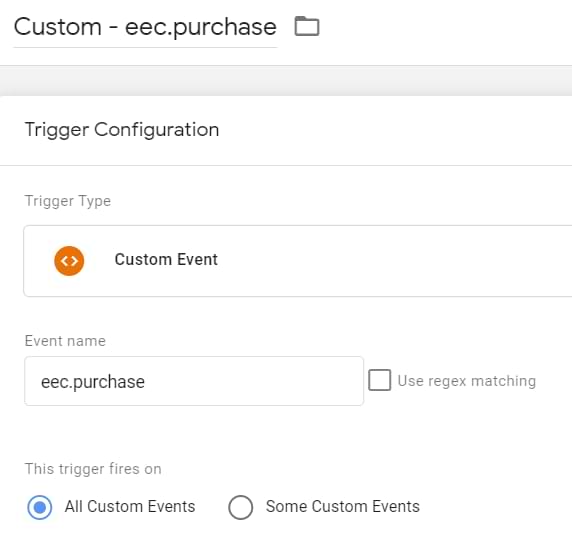
Save the trigger and assign it to the Pinterest Checkout Tag.
#8.3. Test the Checkout tag
The final step is to test the Checkout tag and see if the product (and other) info is received by Pinterest. Save the tag, refresh the GTM preview mode and make a purchase.
When you do that and when the Pinterest Checkout tag fires, open the Pinterest Tag Helper extension and check whether the “Checkout” was sent correctly. Then click it and check whether the product data was properly sent too.
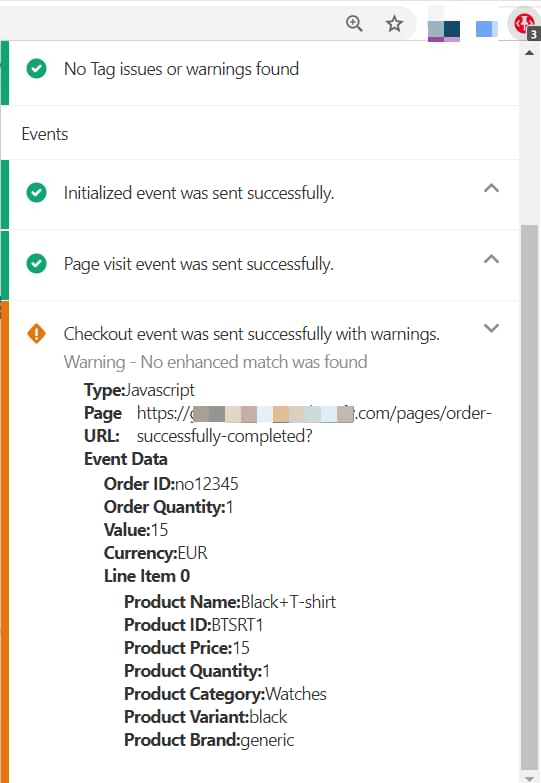
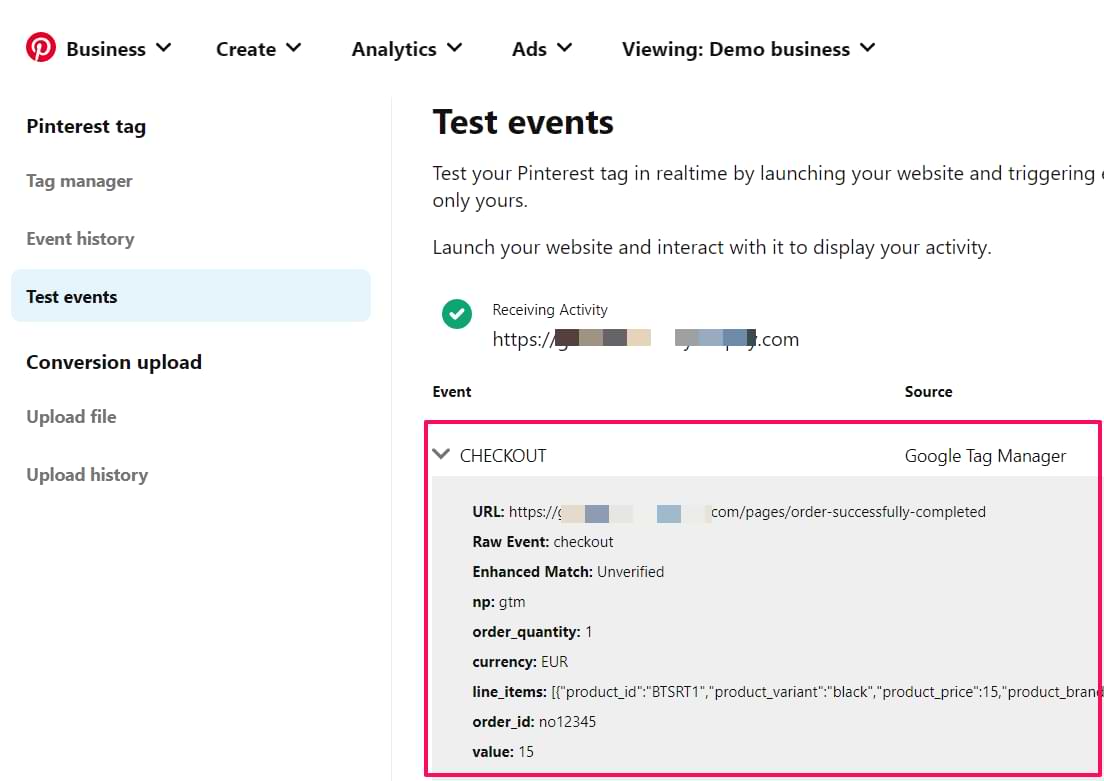
Then go to ads.pinterest.com > Conversions > Test events, enter the URL of the product page, and click Launch. After that, check the Test Events page and expand the CHECKOUT to verify that product data is actually received.
How to use Enhanced Ecommerce data in Pinterest Tag: Final Words
Whew! I was expecting this blog post to be a little shorter. Nevertheless, I hope that you found it useful. Since Pinterest tag is not as popular as the Facebook Pixel, it’s normal that the number of resources and guides is also much more limited.
Hopefully, this article helped you to properly implement everything you wanted.
In this blog post, we:
- Used the Enhanced Ecommerce Product Detail data and sent it to Pinterest with page visits
- Used EE Add To Cart data and sent it to Pinterest with “Add To Cart” events
- Used EE Purchase data and sent it to Pinterest with “Checkout” events. Remember: in Pinterest Tag, Checkout = Purchase
If you are struggling with Pinterest tag in general, take a look at this guide where I dive deeper into a general setup.
Source: analyticsmania